How to configure HTTP/Password Authentication for Nginx in linux servers
In this tutorial we will explain how we can enable HTTP/password authentication to protect a website or content with NGINX web server.
STEP 1: Setup Basic HTTP Authentication credentials.
We use a utility called “htpasswd” to create a file that will contain user and password which will be used to access restricted content.
Verify that apache2-utils (Debian, Ubuntu) or httpd-tools (RHEL/CentOS/Oracle Linux) is installed.
$ sudo yum install httpd-tools [RHEL/CentOS]
$ sudo apt-get install apache2-utils [Debian/Ubuntu]
$ sudo htpasswd -c /etc/nginx/.htpasswd user01
• You’ll be asked to supply and confirm a password for user “user01”.
• If you would like to add additional users to the htpasswd file, remove the "-c" command flag so you don't overwrite the htpasswd file.
$ sudo htpasswd /etc/nginx/.htpasswd user02
• Check the contents of password file.
$ cat /etc/nginx/.htpasswd
User01:$apr1$YsRZsX9/$ZmOStrw5MLg0fjMzUs9ZF0
STEP 2: Configure Nginx for Password Authentication.
We now have a file with our user and password which Nginx can read. Now we will configure Nginx to check this file before serving our protected content.
We will now edit the virtual host now. We can set restrictions on the server level or inside a specific location in Nginx. In this example, we’ll restrict the entire document root.
Within this block, we will add “auth_basic” and “auth_basic_user_file” directives:
• For [RHEL/CentOS]
$ sudo vim /etc/nginx/conf.d/example.com.conf
• For [Debian/Ubuntu]
$ sudo vim /etc/nginx/sites-available/example.com.conf
server {
listen 80 ;
listen [::]:80;
root /var/www/html;
index index.html index.htm index.nginx-debian.html;
server_name example.com;
location / {
try_files $uri $uri/ =404;
auth_basic " Restricted Content ";
auth_basic_user_file /etc/nginx/.htpasswd;
}
}
• Save and close the file when you are finished.
[Debian/Ubuntu] – As Nginx does not make use of the a2enmod package in Ubuntu, the symlinks will need to be created manually between /etc/nginx/sites-available/ and /etc/nginx/sites-enabled.
• To enable the newly created config file, run the following command:
$ sudo ln -s /etc/nginx/sites-available/example.com.conf /etc/nginx/sites-enabled/
• To be doubly sure the task was successful, you can run the following command:
$ sudo ls -lah /etc/nginx/sites-enabled | grep urlname.net
• Test and Restart/Reload Nginx to implement your password policy:
$ sudo nginx -t
$ sudo systemctl restart nginx
OR
$ sudo systemctl reload nginx
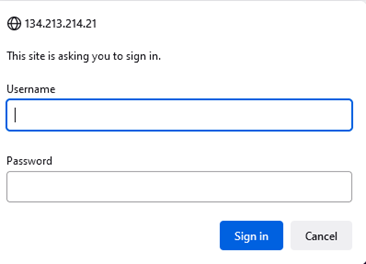
STEP 3: Confirm the Password Authentication
Try to access your restricted content in a web browser to confirm if it is protected.
You should see a pop-up like below: -
Once you will enter correct credentials, you will be allowed to access the content.
If you enter the wrong credentials or hit “Cancel”, you will see the following error page:

Updated 5 months ago