Flex DRaaS
Replication Overview
SDDC Flex Replication services utilizes VMware Cloud Director Availability to provide you the capability to replicate your VMs, vApps and vApp Templates between SDDC Flex regions for disaster recovery and workload migration purposes.
Replications can be configured as either Protections or Migrations:
- Protection:
- after initial synchronization data is replicated to the destination SDDC Flex region at a regular interval in order to meet the configured target recovery point objective
- best suited to be used as part of a disaster recovery strategy.
- Migration:
- after initial synchronization data is replicated to the destination SDDC Flex region once every 24 hours, with a final synchronization trigger at the time of workload migration.
- best suited to be used to move workloads or templates between SDDC Flex regions.
With both replication types, test failovers can be performed prior to the live failover or migration event, allowing you to temporarily bring workloads online at the destination SDDC Flex region whilst continuing to replicate the vApp/VM.
Before you begin
- Log in to the Rackspace SDDC Flex portal.
- Ensure you are logged into your SDDC Flex organization as a user with org administrator privileges
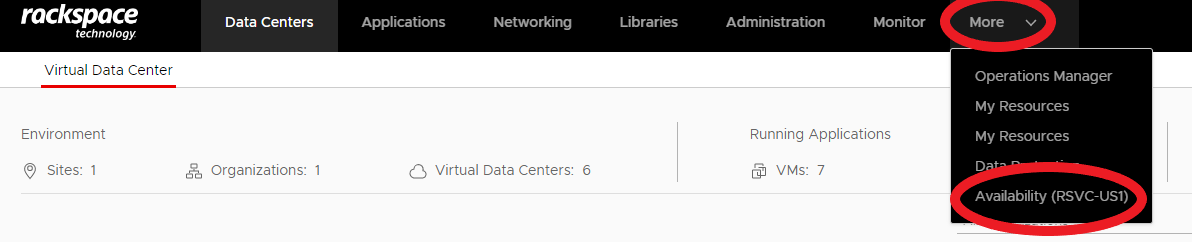
- Click More > Availability (RSVC-region) where region is the SDDC Flex region you are connected to (i.e. US1, US2 etc...). This will open the Availability user interface.
Configuring Replication
Configuring Migration or Protection
This procedure will utilize the "Availability" user interface to configure VM/vApp Protection, however you can also setup Protections by right clicking on the VM in the Cloud Director interface and using the context menu.
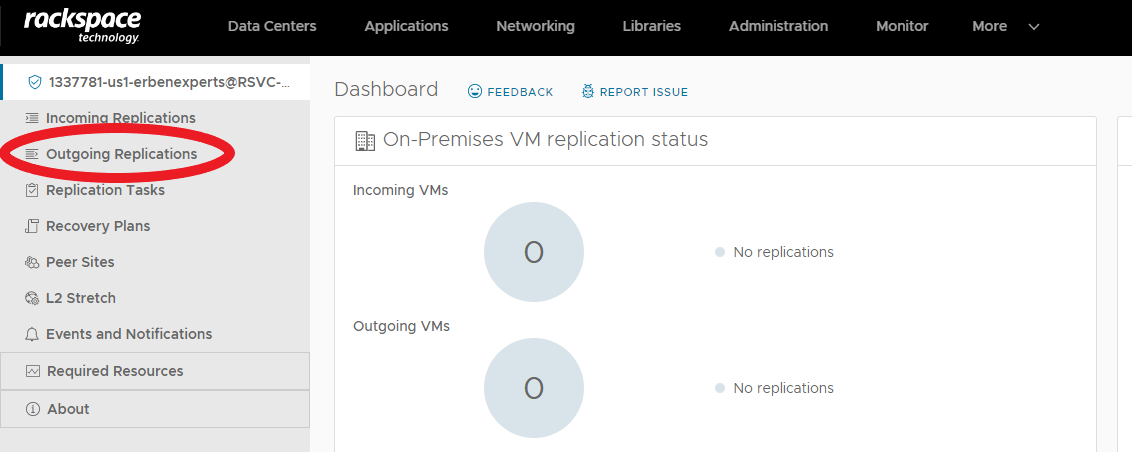
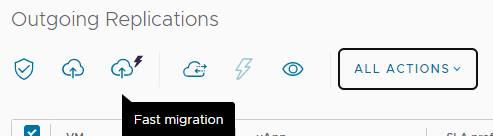
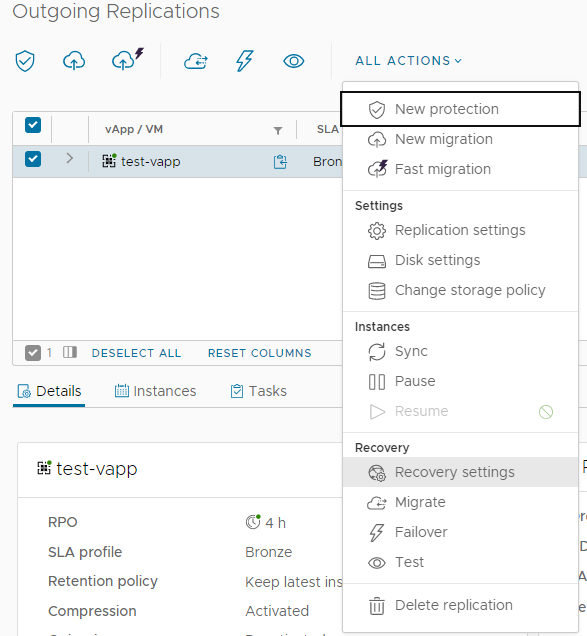
- From the menu on the lefthand side, click Outgoing Replications.
- Replications can also be configured from Incoming Replications using a very similar process as described here.
-
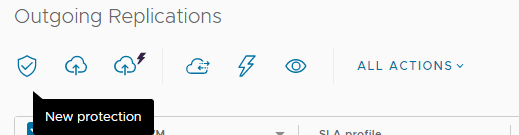
From the Outgoing Replications page:
-
If configuring a Protection, click the shield icon to setup a New Protection. Alternatively, goto ALL ACTIONS > New protection.
-
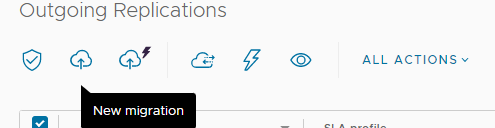
If configuring a Migration, from the Outgoing Replications page, click the Cloud icon to setup a New Migration. Alternatively, go to ALL ACTIONS > New migration.
-
You may also wish to configure a Fast Migration which skips many of the settings options required when configuring a normal Migration. This is useful to quickly setup replication to move a VM data between VDCs when specific compute, storage and networking configuration is either not required or will be configured later. Select this using the Fast Migration icon or alternatively go to ALL ACTIONS > Fast migration.
-
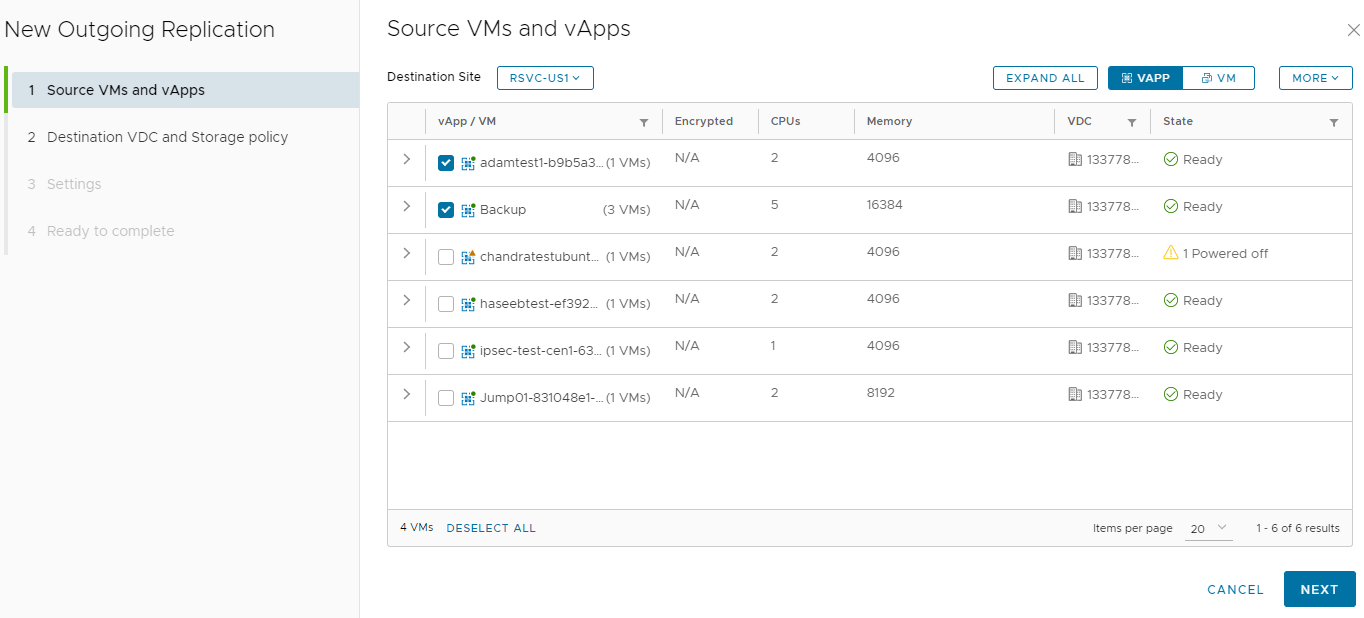
This will open the New Outgoing Replication wizard.
- From the Source VMs and vApps page, check the checkbox against the vApp(s) or VM(s) you wish to replicate.
- Use the Destination Site drop down menu to select the correct SDDC Flex region that you wish to replicate to.
- NOTE: You must already have an organization in this remote SDDC Flex region in order to replicate workloads to it.
- Use the VAPP and VM buttons to change the view of your local site organization between vApps and VMs.
- Multiple vApps/VMs can be selected at one time.
- Replicating a vApp will replicate all VMs in that vApp
- Use the Destination Site drop down menu to select the correct SDDC Flex region that you wish to replicate to.
A yellow triangle with an exclamation mark is shown against the VM signifies that the VM is already being replicated with VCDA.
VMs must be powered on to be replicated or the synchronizations must be manually started.
- Once ready to move on, click NEXT.
- On the Destination VDC and Storage Policy page, select:
- The VDC to replicate the vApp/VM into at the destination VDC.
- The storage policy to use for the vApp/VM at the destination VDC.
- Choose from Performance, Standard, or Capacity.
- Click NEXT when ready to continue.

A single storage policy can be selected to be used at the destination VDC for the replicated vApp/VM.
A summary of resource usage is shown for both the destination VDCs and each destination storage policy.
- On the Settings page,
- if configuring a Protection:
- select the SLA Profile or configure customized replication settings to use for this replication. The replication settings allow you to define:
- Recovery Point Objective (RPO) - the VM will be replicated at an interval to maintain the configured RPO.
- Retention Policy - how many point-in-time instances of your VM(s) do you want to maintain at the recovery site and for how long.
- Compression of replication traffic
- Synchronization sync delay
- select the SLA Profile or configure customized replication settings to use for this replication. The replication settings allow you to define:
- if configuring a Protection:
Four SLA Profiles are available to choose from. Each define a templated set of replication settings:
- Platinum - RPO 1 minute
- Gold - RPO 5 minutes
- Silver - RPO 1 hour
- Bronze - RPO 4 hours
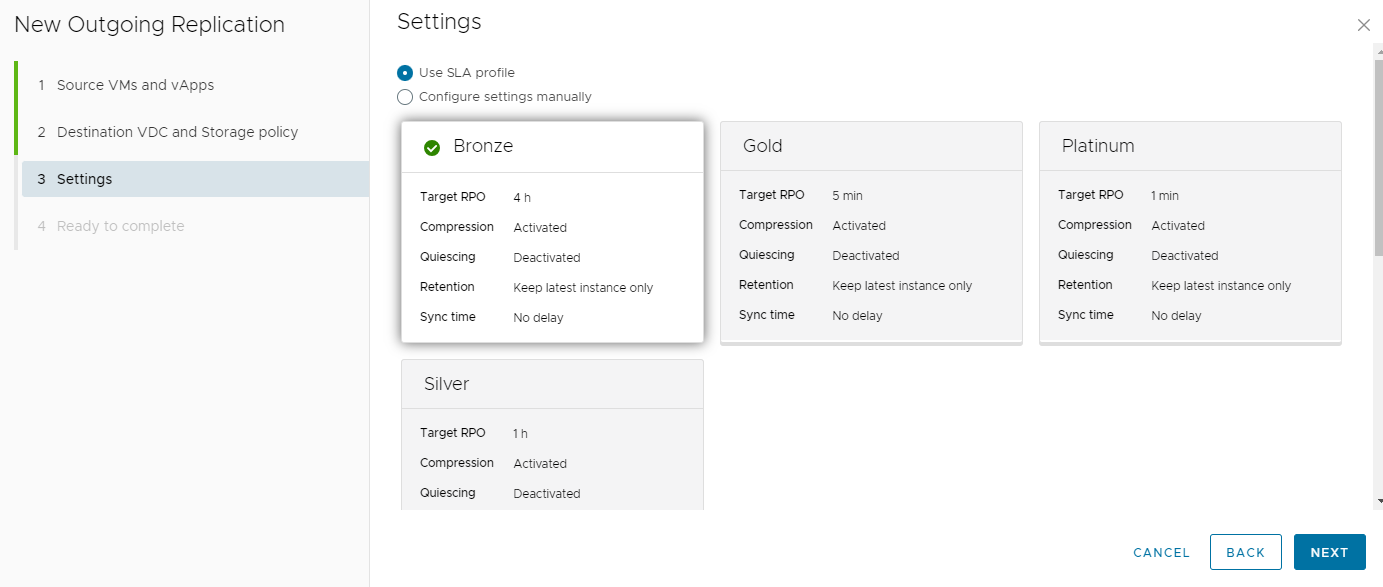
VCDA will replicate your vApp/VM to the destination VDC in order to meet the target RPO selected. For example, if a Silver SLA Profile is selected, the vApp/VM will be replicated at a sufficient interval to try to ensure the VM data at the remote site is no older than 1 hour old. The interval at which data is replicated is dynamically determined based on how long the vApp or VM has previously taken to replicate and the number of data block which have changed since the last replication.
b. Alternatively click Configure settings manually which allows you to customize each of the replication settings.
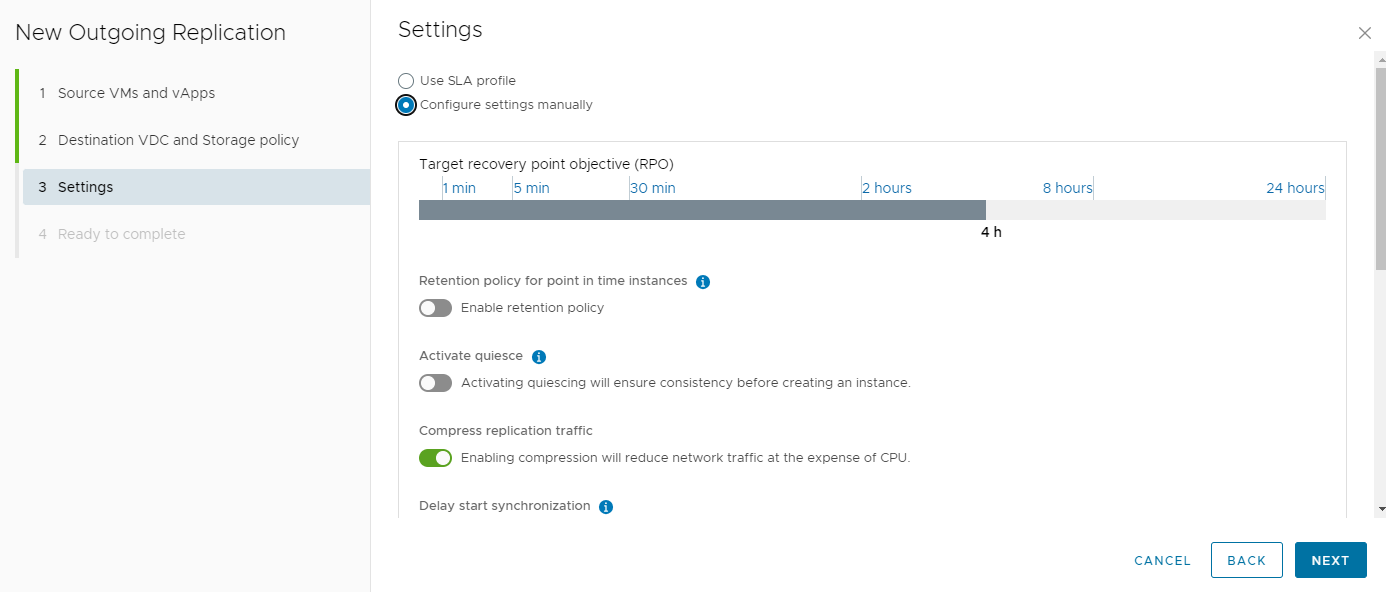
Use the slider to select the required RPO (from 1 minute to 24 hours).
You can also use the Retention policy for point in time instances toggle to enable retention of multiple "versions" of your replicated VM(s) at the recovery site which can be used for recovery.
Each time your VM is replicated a point-in-time instance of your VM is created at the recovery site. This "latest" instance is replaced with the new "latest" instance each time the VM is replicated. Using Retention Policies, you can retain these instances for an extended period of time. Configure retention rules to define the interval and duration you'd like to retain instances of your VMs. Setting the number of Instances defines how many you'd like to keep, and the Distance slider along with the Unit drop down list defines the period of time over which you want to retain those instances. For example, setting the number of instances to 2, distance to 1 and unit to days will retain 1 instance per day for 2 days - so a total of 2 instances.
Multiple retain rules can be added to allow different combinations frequency and retention duration.
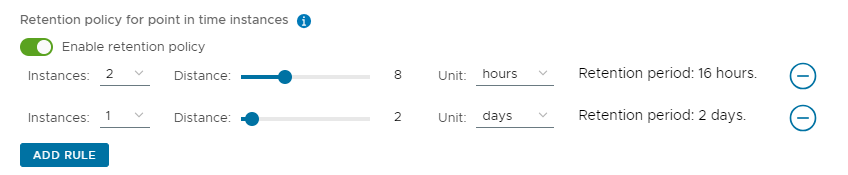
Creating the 2 rules in the above screenshot would result in the "latest" instance being created in addition to 3 additional instances of your VM(s) being available to use for recovery at the recovery site - 2 created at 8 hour intervals, and 1 more created daily.
A maximum of 4 instances can be retained at any time.
c. Toogle the Activate quiesce button to enable quiescing of the VM's guest operating system filesystem when the VM is replicated. This requires VMware Tools is running in the guest OS.
d. Toogle the Compress replication traffic button to enable compression of the replication traffic before being sent to the remote site.
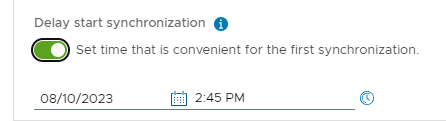
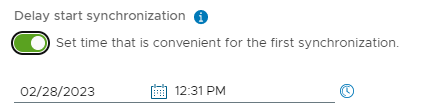
e. Toogle the Delay start synchronization button to optionally start the initial synchronization of your VM(s) at a specific time. This may be useful to stagger the start of multiple replications.
ii. If configuring a Migration, select whether to:
a. Compress replication traffic: if the vApp/VM being migrated is highly compressable enabling compression may reduce the amount of network traffic required to send the data to the destination VDC
b. Delay start synchronization: if multiple vApps or VMs are being configured for migration, you may optionally choose to set a specific start time for the initial synchronization of the data to take place in order to avoid the spread resource usage out across the source vApps/VMs.
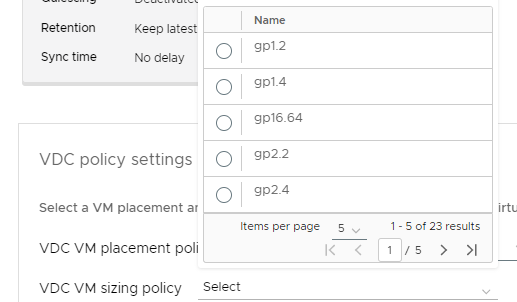
iii. In the VDC policy settings section, use the drop down menu to select the VM Sizing Policy to assign to the VM/vApp after it is failed over
Assigning a VM Sizing Policy to a vApp will cause all VMs within the vApp to inherit the single sizing policy - e.g. assigning gp16.64 to a vApp will cause each VM in the vApp to be configured with 16 vCPUs and 64 GB memory after failover.
iv. Use the Advanced disk settings section to exclude vDisks from replication if desired.
v. Click NEXT to continue when ready.
- Finally, review the configuration on the Ready to complete page and click FINISH to start the replication initial sync.
- The initial configuration and sync of the VMs will then start. You can view their status from the VCDA UI.
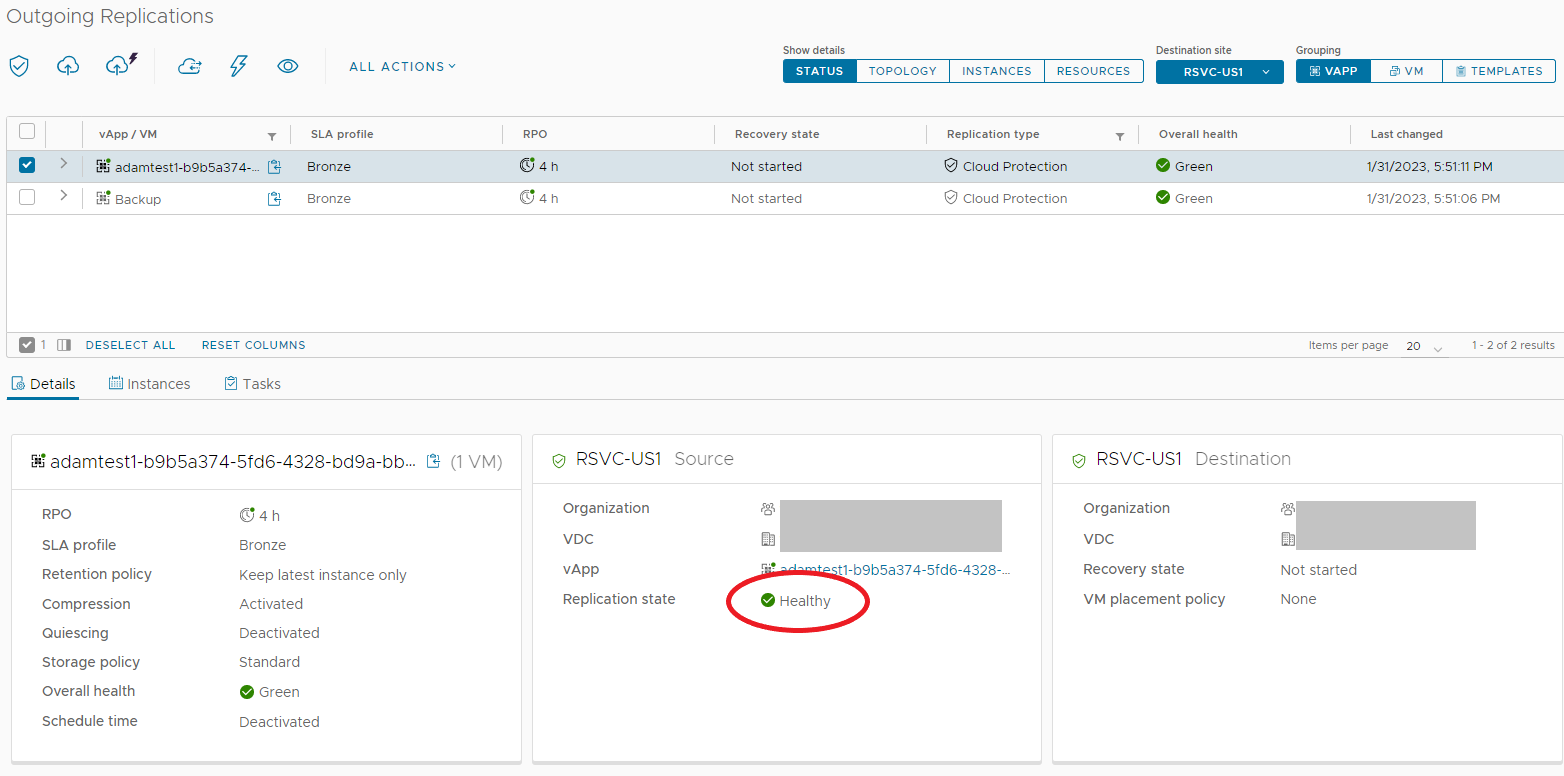
- Check the checkbox next to the VM you wish to view details to open additional information panes below. This includes information about the synchronization activity.
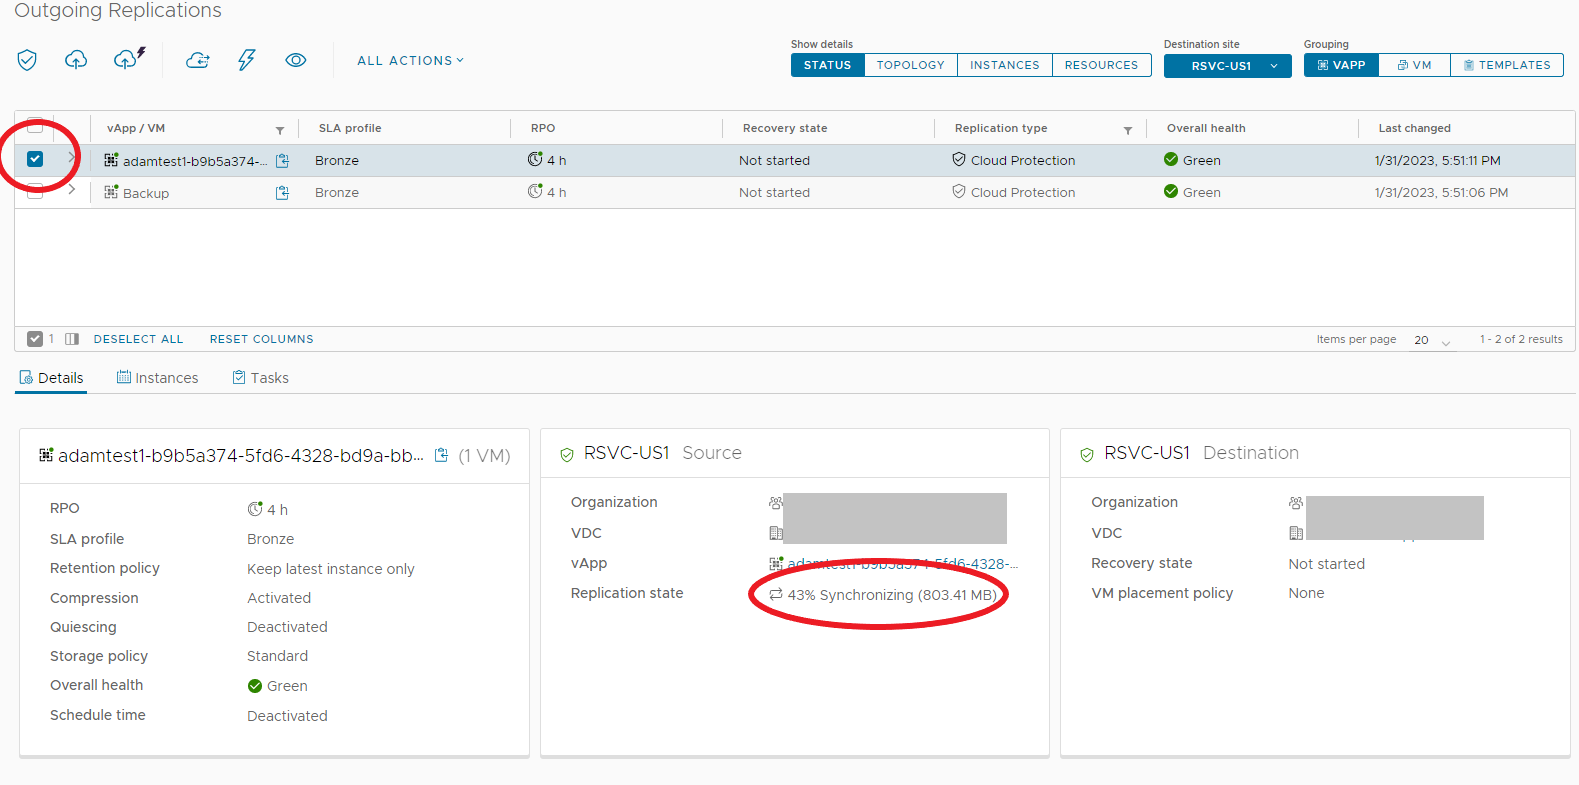
ii. When the initial sync has completed, the VMs will go into a Healthy status.
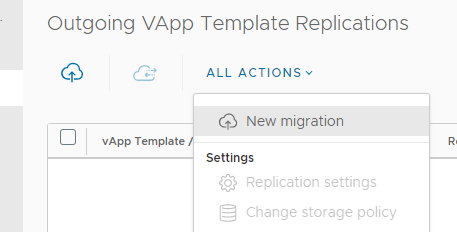
Configuring vApp Template Migration
Migrations can be used to replicate vApp templates from VDC to VDC.
- From the menu on the lefthand side, click Outgoing Replications or Incoming Replications.
- Click TEMPLATES in the Groupings section.

- Click the Cloud icon to setup a New Migration. Alternatively, goto ALL ACTIONS > New migration
- From the Catalogs page, select the Destination Site from the drop-down menu, and then choose a catalog and a template to replicate.
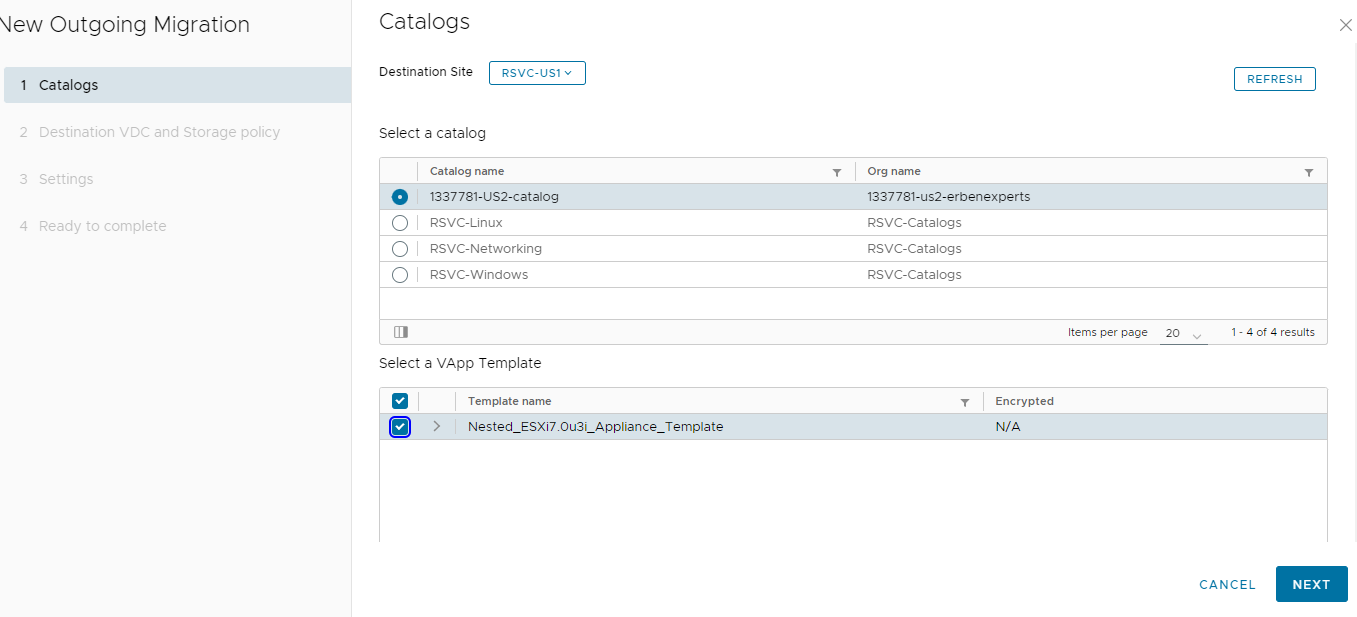
Then click NEXT.
- On the Destination VDC and Storage Policy page, select the required VDC and storage policy at the destination site to replicate the template into.

Then click NEXT.
- From the Settings page, choose whether to enable compression of the replication and optionally schedule a delayed start time for the initial synchronization.

Then click NEXT.
- Finally click FINISH on the Ready to complete page.
Configuring Recovery Settings
Once the replication has been configured, setup Recovery Settings to be applied to the vApps/VMs following failover or migration to the remote SDDC Flex region.
- From the menu on the lefthand side, click Outgoing Replications or IIncoming Replications.
- Select the vApp/VM you wish to configure Recovery Settings for by checking the box next to the vApp/VM and then going to ALL ACTIONS > Recovery > Recovery Settings.
From the Recovery settings page you can configure vApp/VM settings for migrations and failovers, as well as configuring settings specifically for use during test failovers events.
- Select the Migrate/Failover tab if you wish to configure settings to be used during live failover or migrations or select the Test tab to configure settings to be used during test failovers.
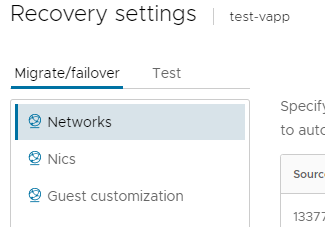
Each tab will show the same 3 options (Networks, Nics, Guest customization) but you may configure the settings independently for each tab.
- Use the Networks option to specify how the networks at the source SDDC Flex region should be mapped to the networks at the destination region for the vApp/VMs being replicated. Each each source region network, select the appropriate destination region network which should be configured on the vApp/VMs following failover.
- If a target network is not mapped for a source network, the system will try and automatically determine which target network to use based on the gateway address.

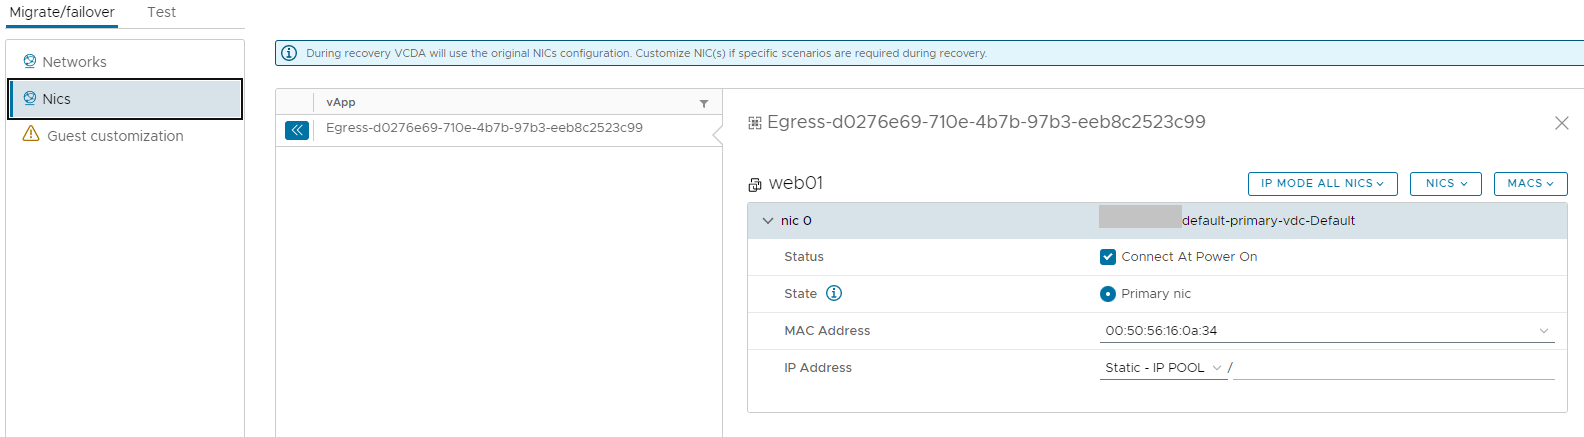
- Use the Nics option to configure individual settings for each VM's vNIC. These settings can also be set across all vNICs configured on the VM at one time using the IP MODE ALLNICS, NICS, and MACs drop down menus.
The following settings can be configured on each vNIC:- Status: Select whether to connect the vNIC at VM power on or not
- State: Select which vNIC on the VM is the primary vNIC
- MAC Address: Select whether to retain the existing MAC address of the vNIC or reset it to a new one after failover.
- IP Address: Select the IP addressing mechanism (DHCP, Static - IP Pool, Static - Manual, or None) and set the IP address to use (if applicable)
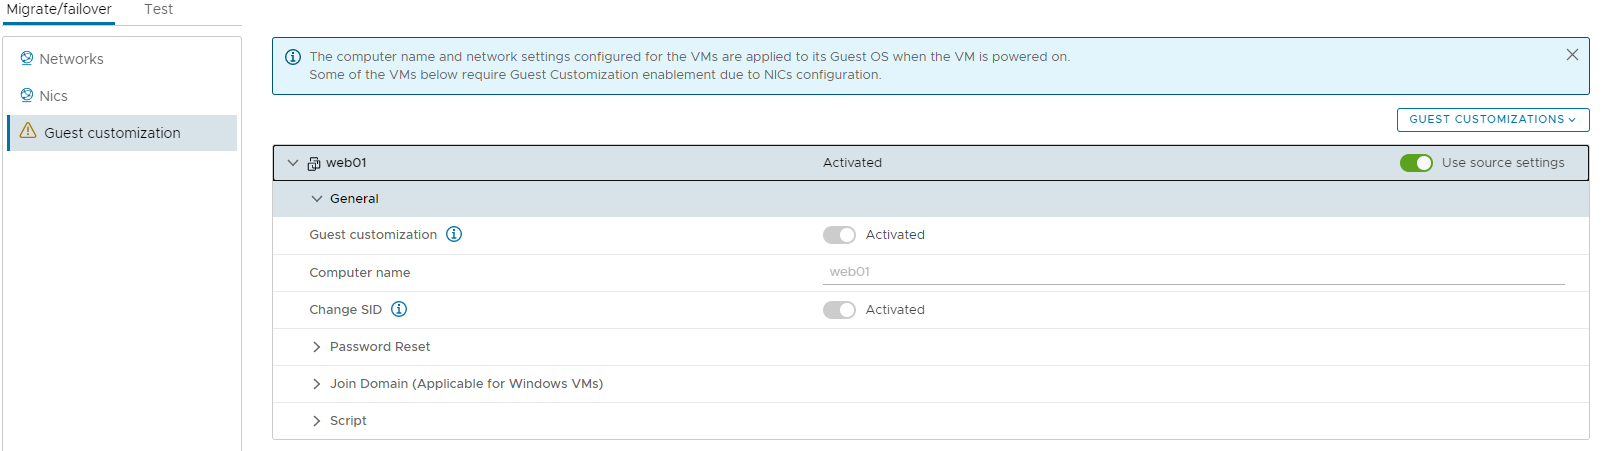
- Use the Guest customization option to set the guest customization settings for each VM. You may also choose to use the same settings as exist on the source VM. Configurable options include:
- Guest customization activated/deactivated
- Computer name
- Change SID
- Password reset
Guest customization must be activated in order to any vNIC changes specified to take effect.
Click APPLY to set the recovery settings.
Recovery
Recovery can be performed in 3 ways - test, failover, and migration.
Configuring Recovery and Migration Plans
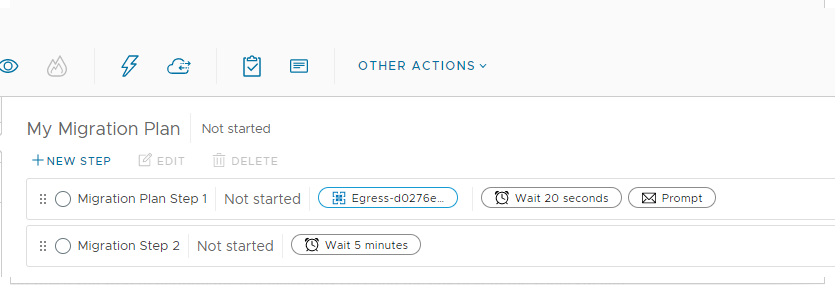
You may wish to configure Recovery or Migration plans to act as run books for orchestrating migration or failover actions across multiple VMs or vApps.
Recovery and Migration plans are not required to perform recovery actions on one or multiple VMs or vApps, but they may be useful to tie actions together and add pauses or informational messages between VM failover events.
Recovery and Migration plans should be configured on the destination SDDC Flex region, not the region where the vApps/VMs are currently running.
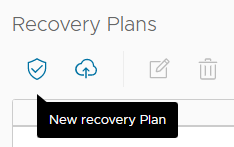
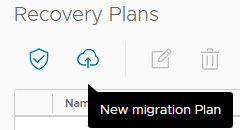
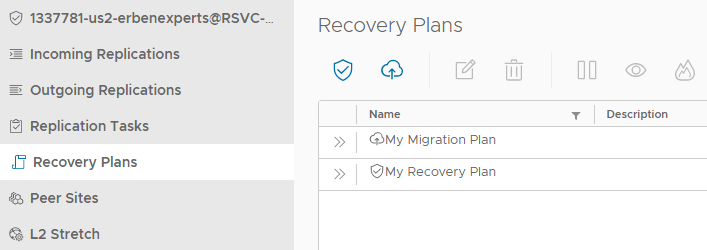
- From destination SDDC Flex region, click on Recovery Plans on the menu on the lefthand side of the Availability interface.
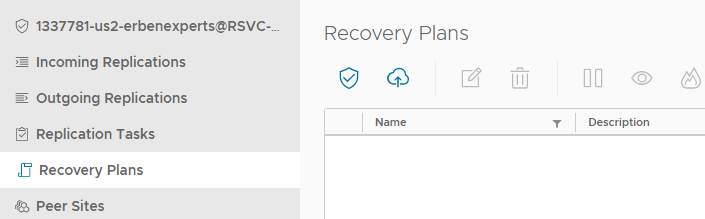
- Then click either the shield to create a new Recovery Plan or the cloud icon to create a new Migration Plan
- Recovery Plans and Migration Plans are very similar however Recovery Plans only allow you to add Protection replications, whilst Migration Plans only allow you to add Migration replications.
- Give the plan a name and optional description.
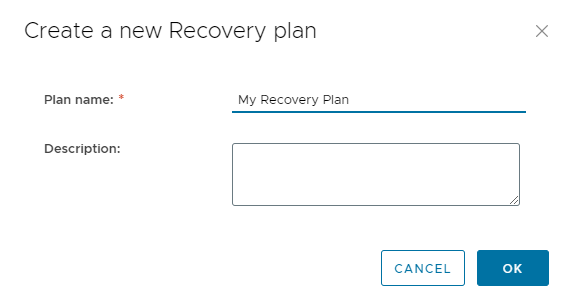
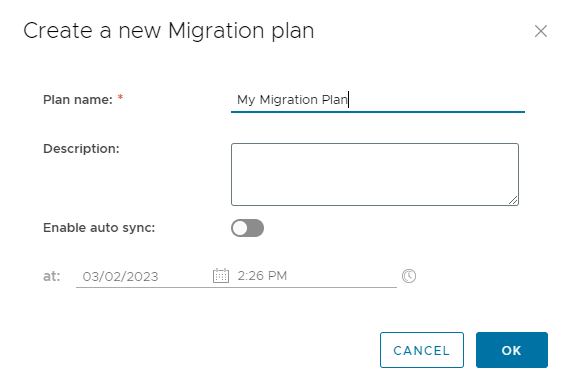
i. If configuring a Migration Plan, optionally enable auto sync and set the date and time at which you'd like the Migration replications to perform a one-off additional synchronization (Migrations normally sync once a day)
a. This may be useful to perform a one-off sync of data prior to the expected date and time of a migration operation in order to save time during the migration itself.
Click OK to create the plan. Once the plan has been created, it will be added to the list of Recovery/Migration plans on the Recovery Plans page.
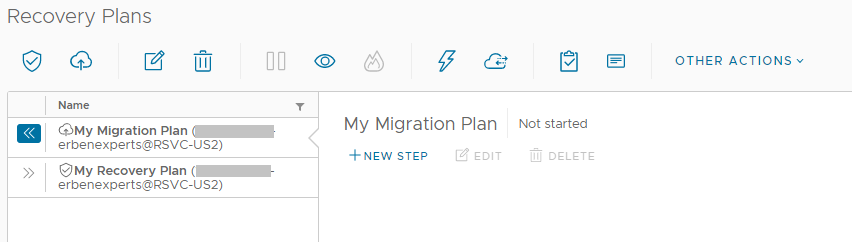
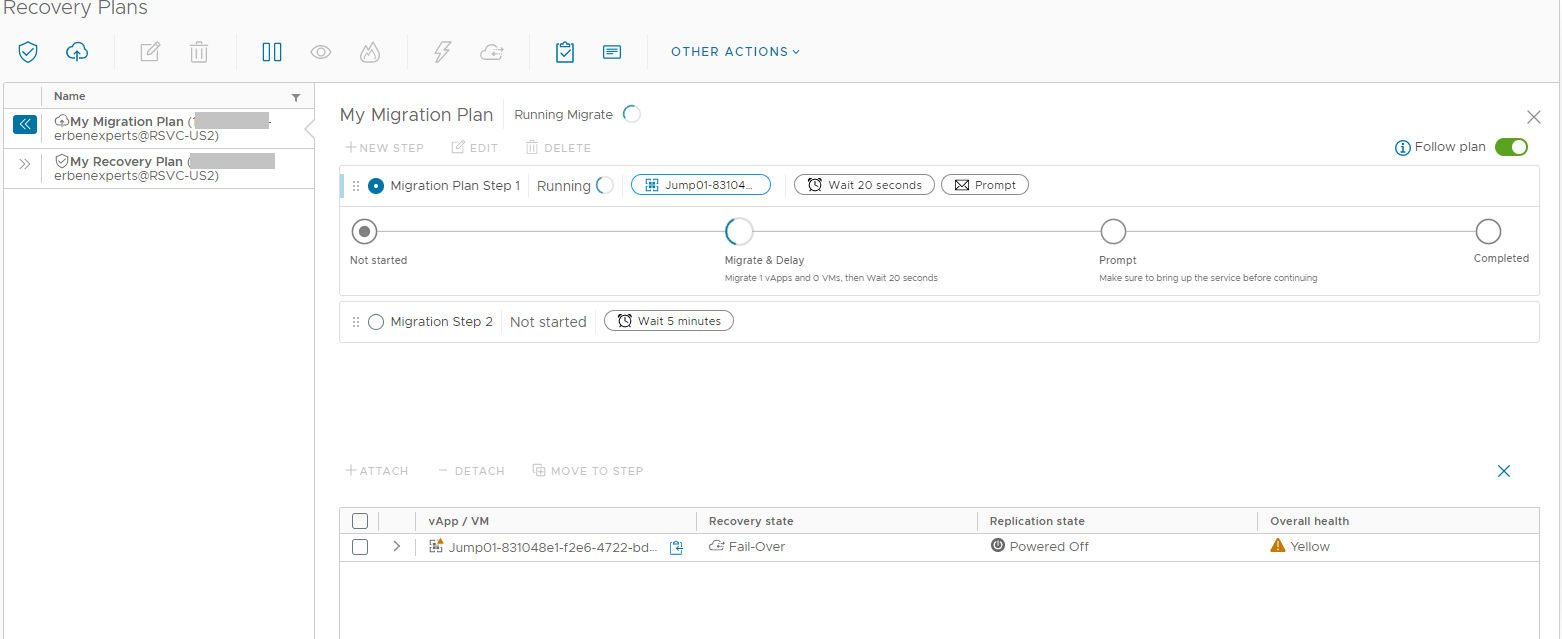
- Click on the arrows next to the name of your plan to highlight it, and then click NEW STEP to add a new step to the plan.
- Give the new step a name and optionally configure:
- Wait specific amount of time after failover completes: Add a delay in seconds or minutes following this step.
- Prompt user after failover of all replications in this step completes: Add a message which will be displayed in the user interface following completion of this step. The message will have to be acknowledged by the user before the plan will continue
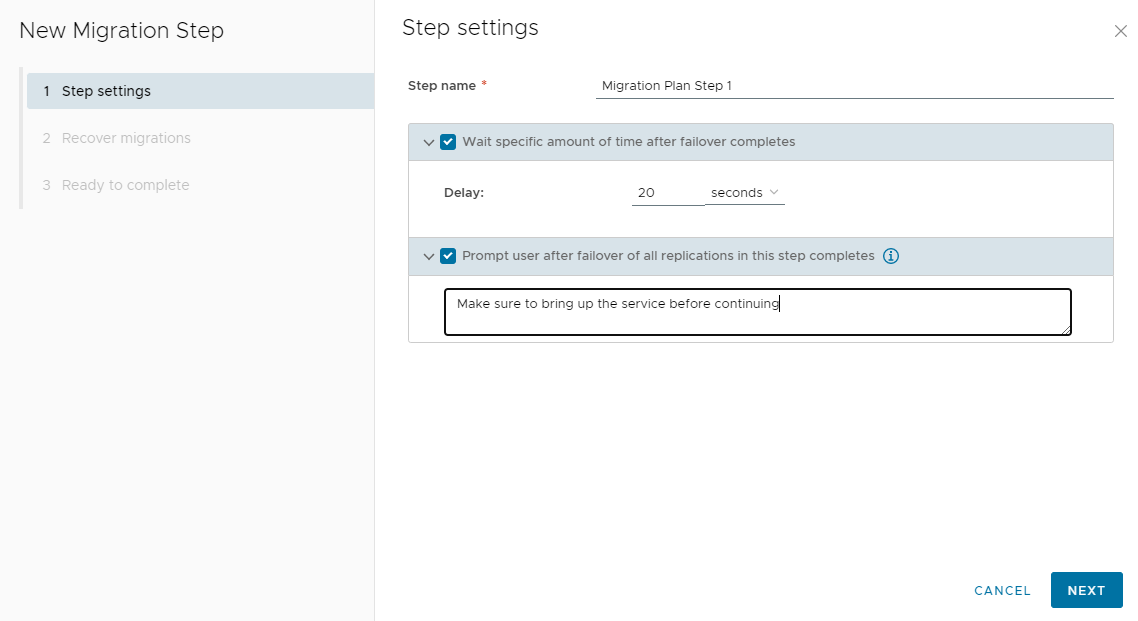
These options are available for both Migration and Recovery Plans.
Then click NEXT.
- Select the Migrations (only for Migration Plans) or Protections (only for Recovery Plans) to include in the step.
- NOTE: Protections and/or Migrations must already have been configured in order to add them to the plan
Then click NEXT to continue.
- Finally click FINISH to add the step to the plan.
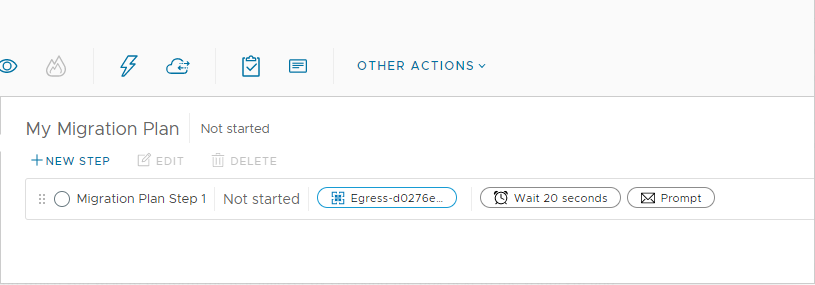
- The step will then appear in the list of steps associated with the plan.
- Repeat the previous instructions to add additional steps to the plan as needed.
Performing a Test Failover
Test failovers can be performed on vApp/VM replications configured as Protections or Migrations.
Performing a test failover will consume additional CPU, memory and storage quota at the destination organization.
For example, replicating a VM with 2 vCPUs, 4GB RAM, and 100GB storage will initially consume 100GB of storage from the destination site quota. If you run a test failover, an additional 100GB of storage quota will be consumed at the destination organization in addition to 2 vCPUs, and 4GB RAM. The storage quota usage is in addition to quota consumed by the original replicated disk.
- From the menu on the lefthand side, click Outgoing Replications or Incoming Replications.
- Select the vApp/VM on which you wish to perform the test failover by checking the box next to the vApp/VM and then going to ALL ACTIONS > Recovery > Test.
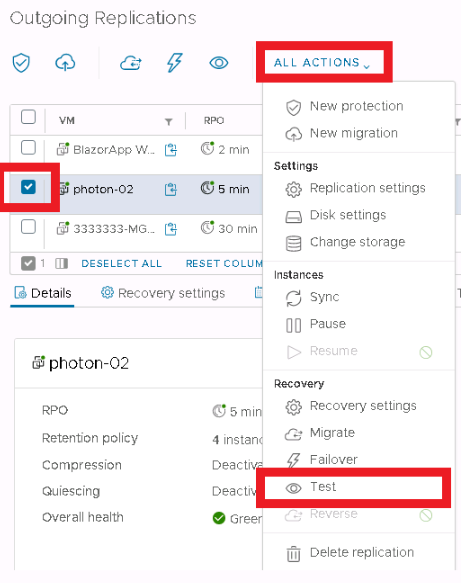
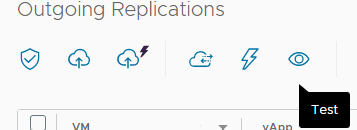
Alternatively use the shortcut button for test failover.
- From the Recovery Settings page, select:
- Power Settings: Should the recovered vApp/VM power on after failover?
- Network Settings: Use any preconfigured recovery settings configured for use during test failovers or override and connect all VMs to a single network at the destination region
- VDC compute and sizing policies: Select the VM Sizing Policy to apply to the VMs following test failover.
- NOTE: this field will be automatically populated if you have pre-configured the VM Sizing Policy

Click NEXT when ready to continue.
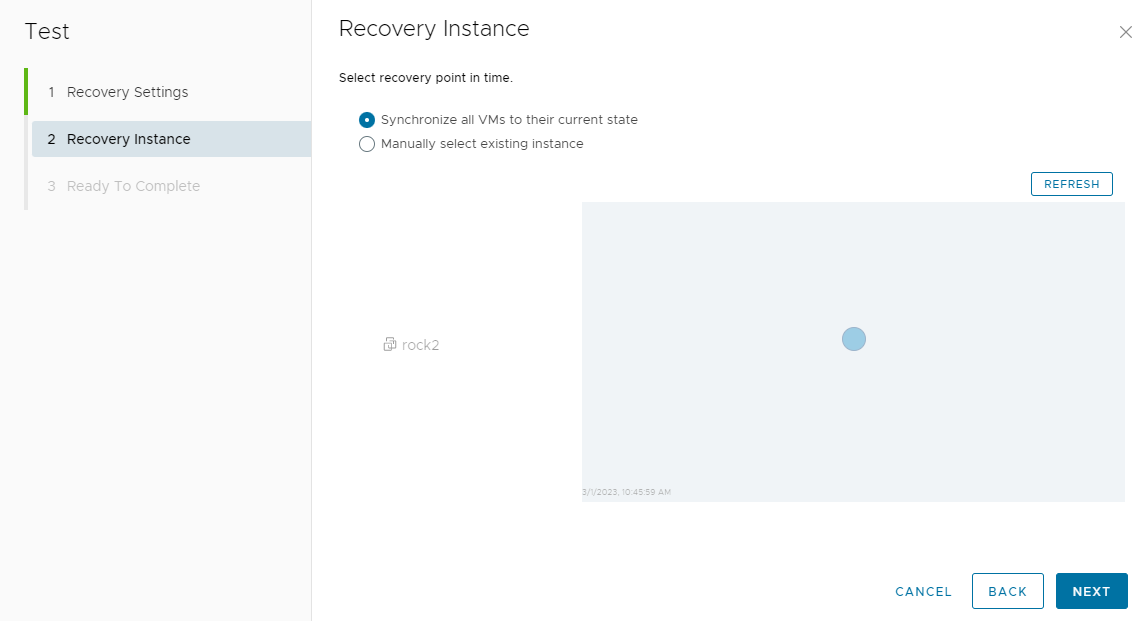
- On the Recovery Instance page, choose whether to bring the test vApp/VM online using the last replicated instance, or to perform a synchronization as a part of the test procedure.
- Synchronize all VMs to their current state: choose this option to perform a fresh synchronize of the latest VM data as a part of performing the failover test.
- Manually select existing instance: choose this option to failover the VM using the most recently replicated existing instance of the vApp/VM.
- The date and time when the last instance were replicated to the destination VDC can be seen in the graphic displayed.
- NOTE: multiple recovery instances are not currently supported in SDDC Flex
Click NEXT to continue.
- Finally, on the Ready To Complete page, click FINISH to start the test failover.
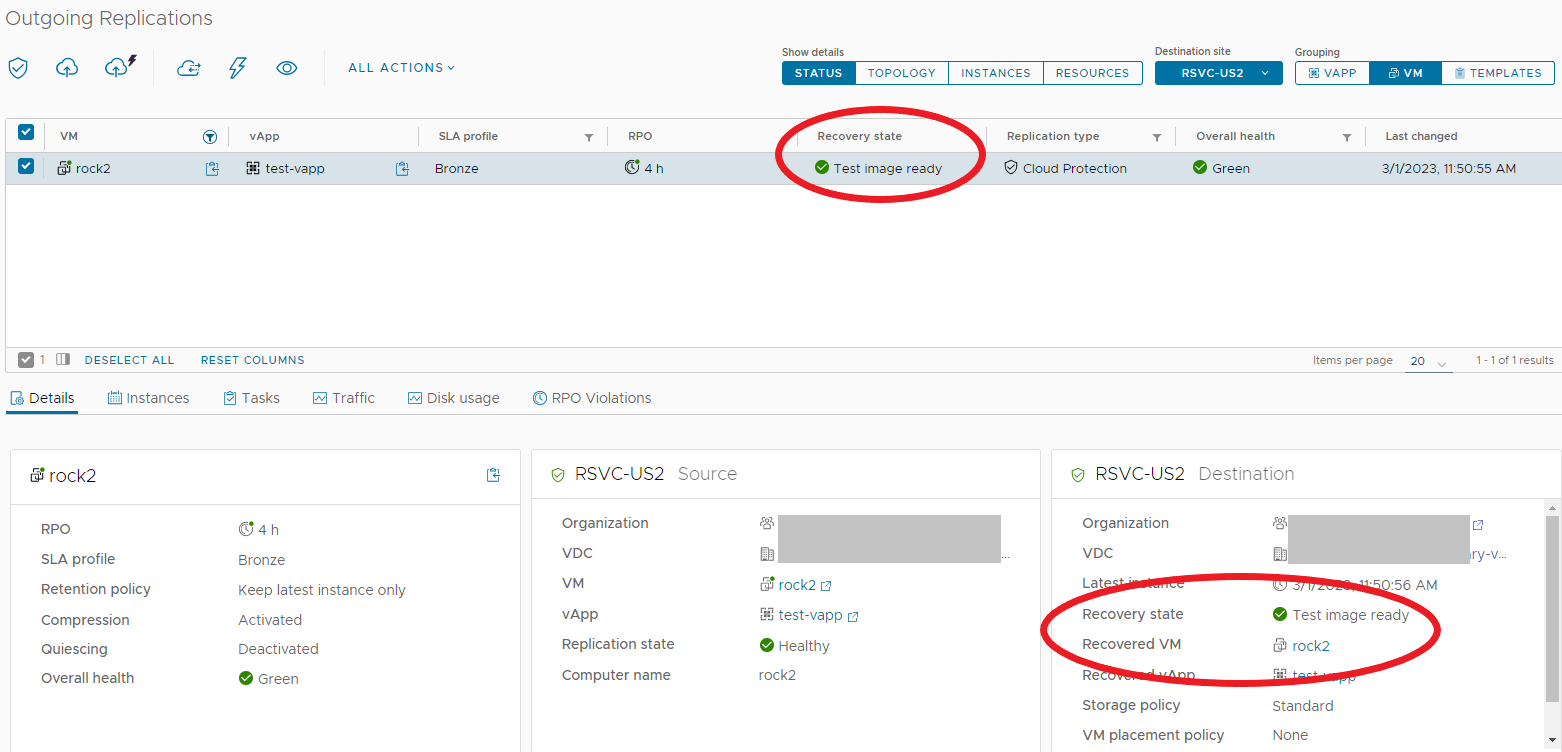
- View the Last changed column for your vApp/VM to monitor the status of the test failover

Alternatively, go to Replication Tasks and view the status of the Test task.

- When the test vApp/VM is ready the Recovery State column in Outgoing Replications (or Incoming Replications) will show as Test image ready.
- Please note, if you are performing a test recovery on a single VM, it will be recovered into a vApp. Details of this recovered vApp can also be found in the interface.
- Navigate to Data Centers and open the relevant Virtual Data Center to find your test vApp/VM. The recovered test VM(s) can be used like any other VM in your organization for the duration of the test.
- NOTE: any data written to the VM during the test will count towards the organization's storage quota
- When testing has been completed, clean up the test VM(s) by selecting ALL ACTIONS > Test Cleanup from the interface.
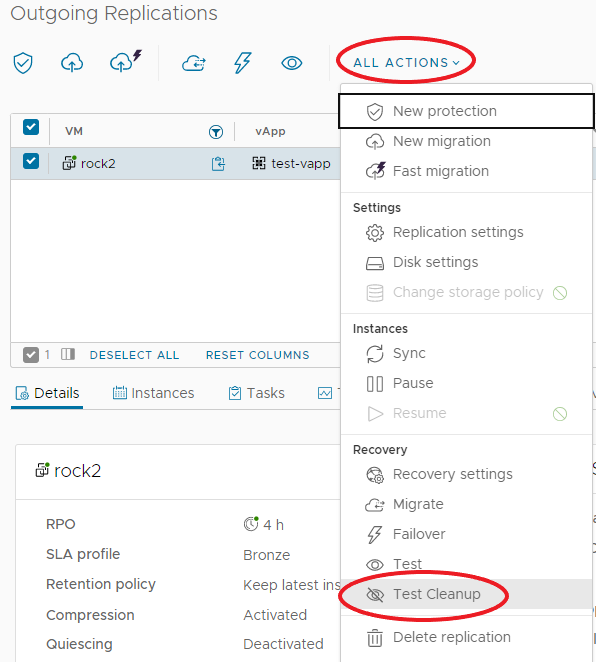
This will power off and delete the test vApp/VM.
Performing a vApp/VM Failover
Failovers can be performed on vApp or VM replications configured as Protections. Migrations cannot be failed over, only migrated.
- From the menu on the lefthand side, click Incoming Replications.
- Select the vApp/VM on which you wish to perform the failover by checking the box next to the vApp/VM and then going to ALL ACTIONS > Recovery > Failover.
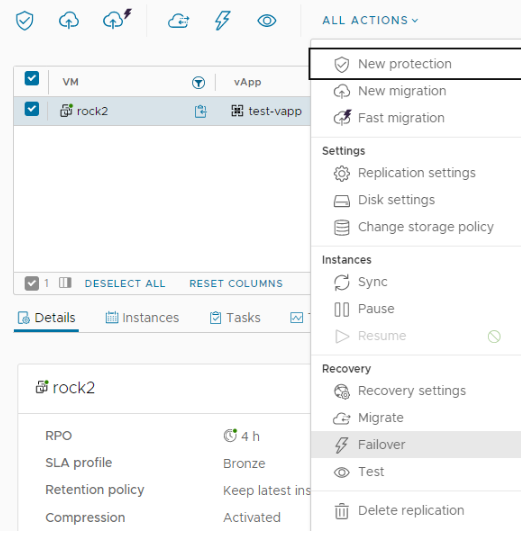
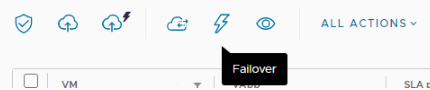
Alternatively use the shortcut button to start a failover.
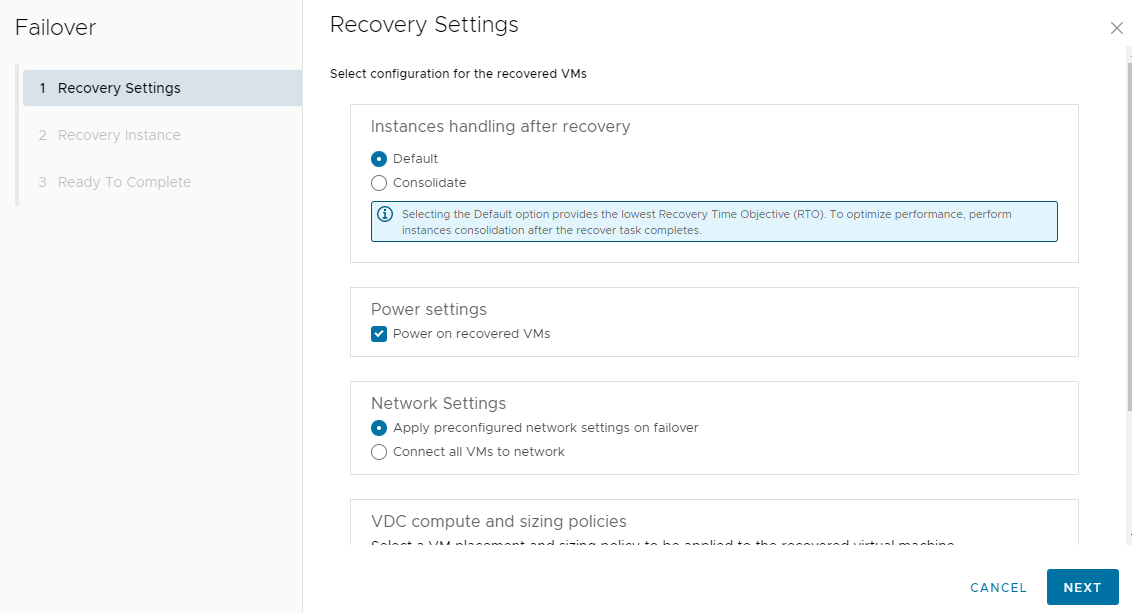
- From the Recovery Settings page, select:
- Instances handling after recovery: Cloud Director Availability attempts to replicate a VM's data from source to destination VDC at an interval sufficient to meet the configured target recovery point objective. When it does this any VM data blocks which have changed since the last replication are replicated and written to a "instance" vDisk at the destination VDC before later being committed to the VM's recovered vDisk. Prior to failover there will always be at least one instance vdisk and one recovered vdisk for each VM being replicated.
When performing failover, you may choose the Default action to bring the VM online as quickly possible and retain the instance vdisk, or you can choose to Consolidate the instance vdisk into the recovery vdisk before bringing the VM online. Consolidating may improve VM performance but delay the VM coming online as the consolidation task completes.
If you choose the default action and bring the VM online without consolidating, you can consolidate the vdisks later. - Power Settings: Should the recovered vApp/VM power on after failover?
- Network Settings: Use any preconfigured recovery settings configured for use during failovers or override and connect all VMs to a single network at the destination region
- VDC compute and sizing policies: Select the VM Sizing Policy to apply to the VMs following failover.
- NOTE: this field will be automatically populated if you have pre-configured the VM Sizing Policy
- Instances handling after recovery: Cloud Director Availability attempts to replicate a VM's data from source to destination VDC at an interval sufficient to meet the configured target recovery point objective. When it does this any VM data blocks which have changed since the last replication are replicated and written to a "instance" vDisk at the destination VDC before later being committed to the VM's recovered vDisk. Prior to failover there will always be at least one instance vdisk and one recovered vdisk for each VM being replicated.
Click NEXT when ready to continue.
- On the Recovery Instance page, click NEXT to continue. The most recent recovery instance will be used to failover the VM.
- The date and time when the last instance was replicated to the destination VDC can be seen in the graphic displayed.
- NOTE: multiple recovery instances are not currently supported in SDDC Flex
- On the Ready To Complete page, click FINISH to start the failover.
- View the Last changed column for your vApp/VM to monitor the status of the failover.

Alternatively, go to Replication Tasks and view the status of the Failover task.

- When the test vApp/VM is ready the Recovery State column in Outgoing Replications (or Incoming Replications) will show as Failed-over.
- Please note, if you are performing a recovery on a single VM, it will be recovered into a vApp. Details of this recovered vApp can also be found in the interface.
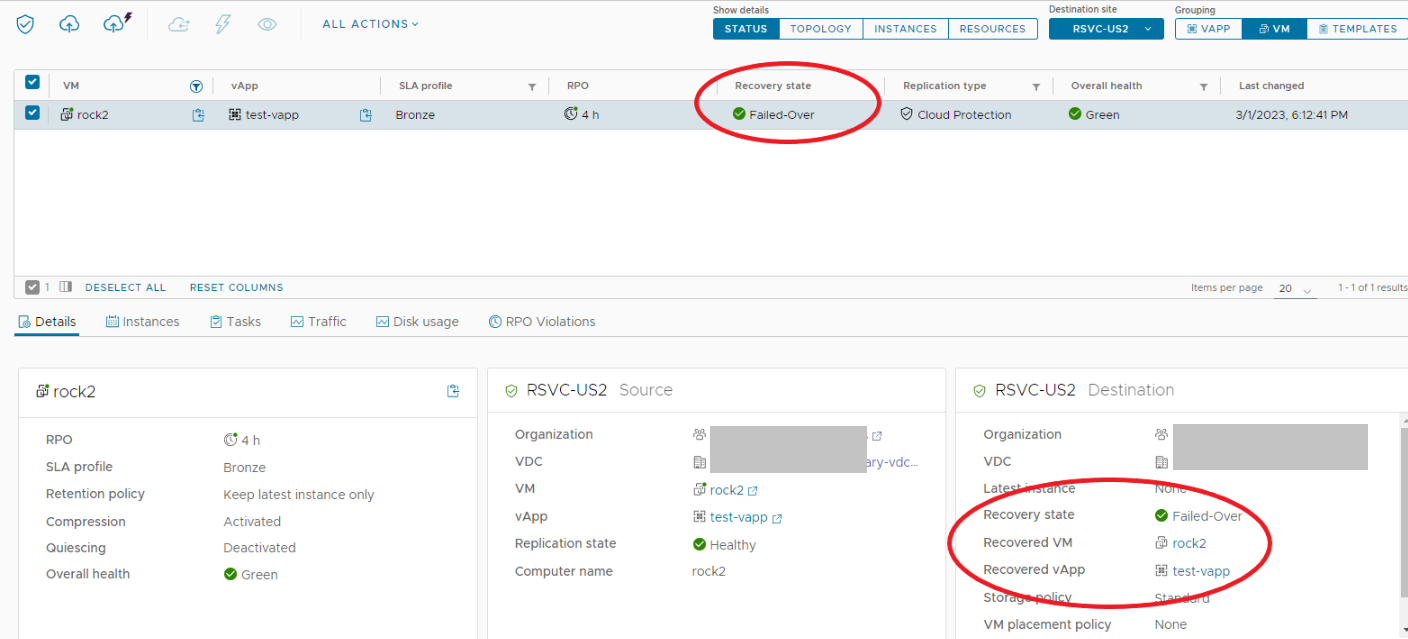
- Navigate to Data Centers and open the relevant Virtual Data Center to find your recovered vApp/VM
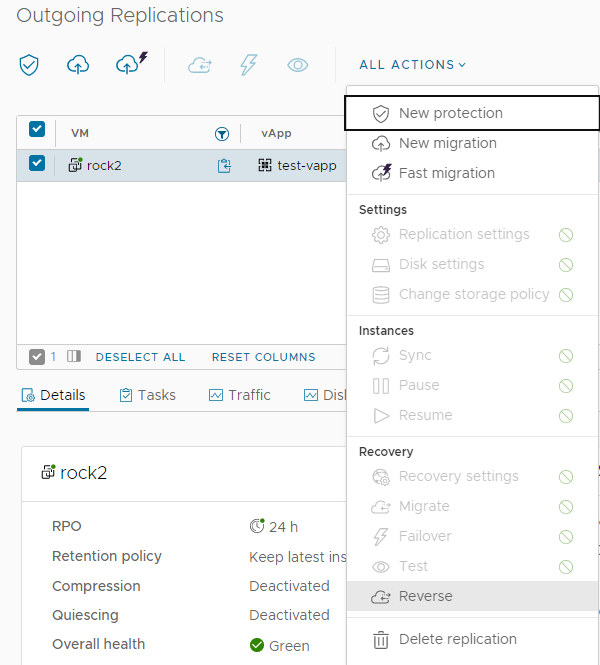
- Following a failover, you may optionally choose to use the original source VM as a seed for replicating back to the original source VDC. This is called reverse replication.
- With the VM selected, click ALL ACTIONS > Reverse.
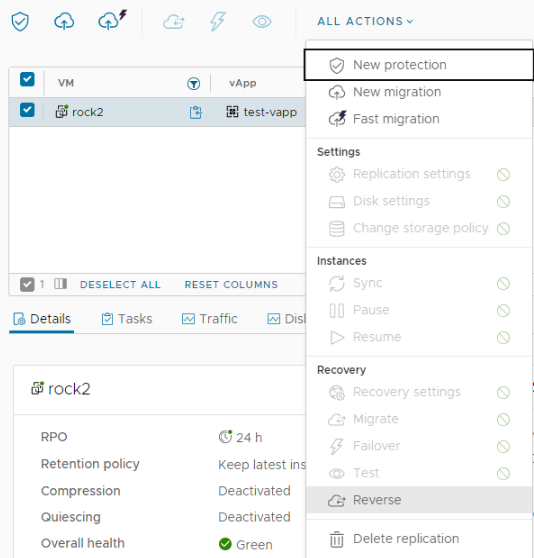
- If the replication is not being reversed, the VM replication can be cleaned up by selecting the VM and clicking ALL ACTIONS > Delete replication.
- This will remove the replication configuration for the vApp/VM from VCDA. The vApp/VM itself will not be changed.
Performing a vApp/VM Migration
Migrations can be performed on vApp or VM replications configured as Protections or Migrations.
Performing a migration carries out the following steps:
- If the source VM is powered on, a pre-power off synchronization will be performed to replicate any changed data blocks to the destination VDC. The source VM will then be powered off.
- A synchronization will be performed on the powered off VM (this is in addition to the sync performed if the VM was powered on).
- The VM is then imported into the destination VDC and optionally powered on.
- The original source VM is left powered off.
- From the menu on the lefthand side, click Outgoing Replications or Incoming Replications.
- Select the vApp/VM on which you wish to perform the migration by checking the box next to the vApp/VM and then going to ALL ACTIONS > Recovery > Migrate.
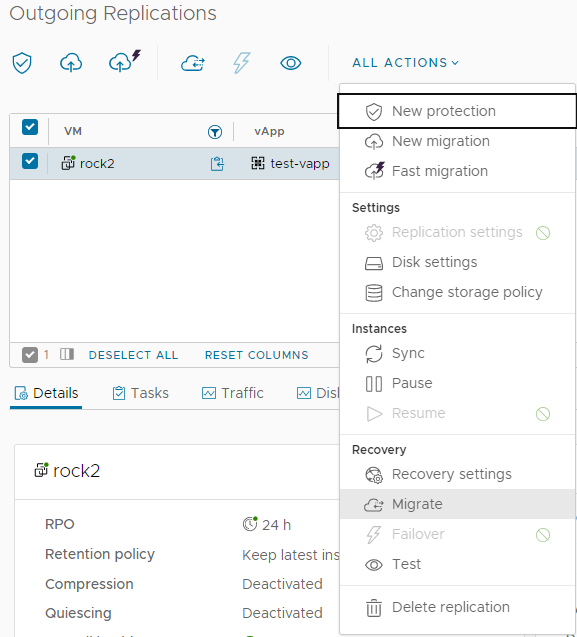
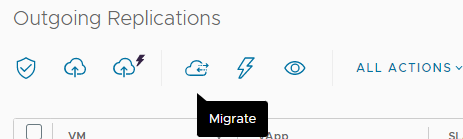
Alternatively, use the shortcut button to start a migration.
- From the Migrate Settings page, select:
- Power Settings: Should the recovered vApp/VM power on after migration?
- Network Settings: Use any preconfigured recovery settings configured for use during migration or override and connect all VMs to a single network at the destination region
- VDC compute and sizing policies: Select the VM Sizing Policy to apply to the VMs following migration
- NOTE: this field will be automatically populated if you have pre-configured the VM Sizing Policy
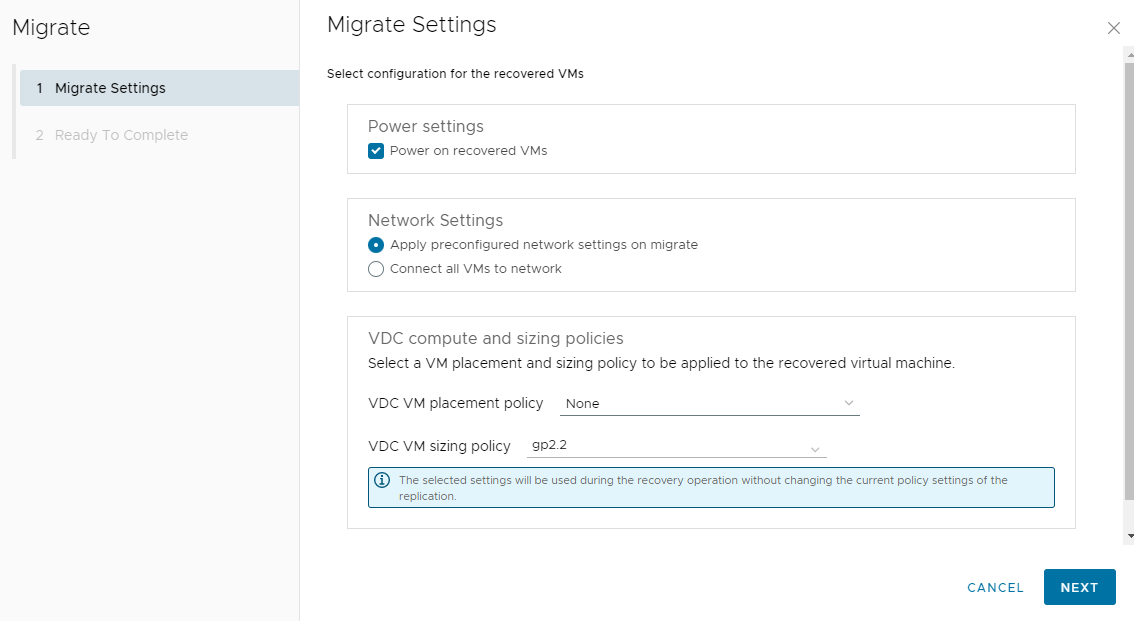
Click NEXT when ready to continue.
- On the Ready To Complete page, click FINISH to start the migration.
- View the Last changed column for your vApp/VM to monitor the status of the failover.

Alternatively, go to Replication Tasks and view the status of the Migrate task.

- When the test vApp/VM is ready the Recovery State column in Outgoing Replications (or Incoming Replications) will show as Failed-over.
- Please note, if you are performing a recovery on a single VM, it will be recovered into a vApp. Details of this recovered vApp can also be found in the interface.
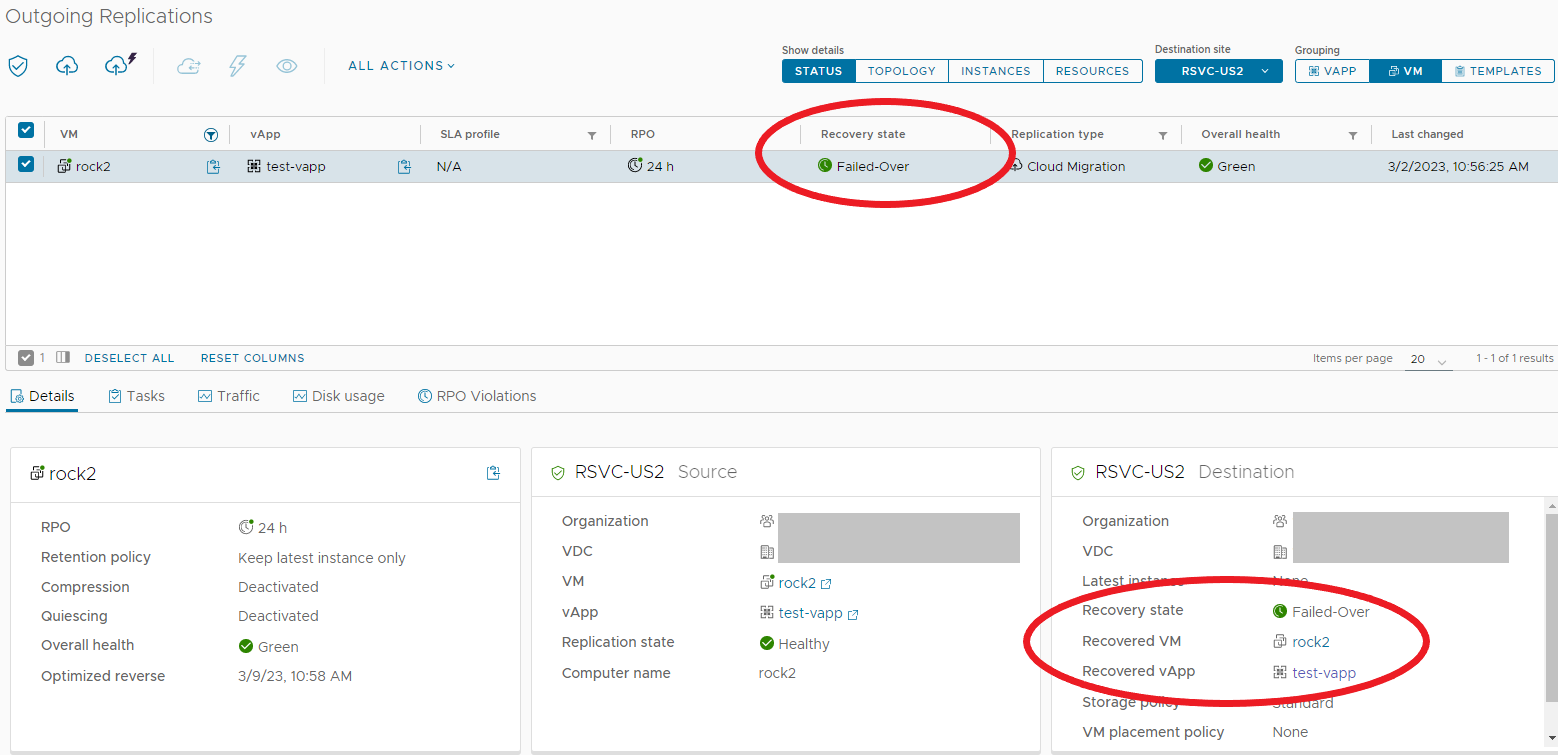
- Navigate to Data Centers and open the relevant Virtual Data Center to find your recovered vApp/VM.
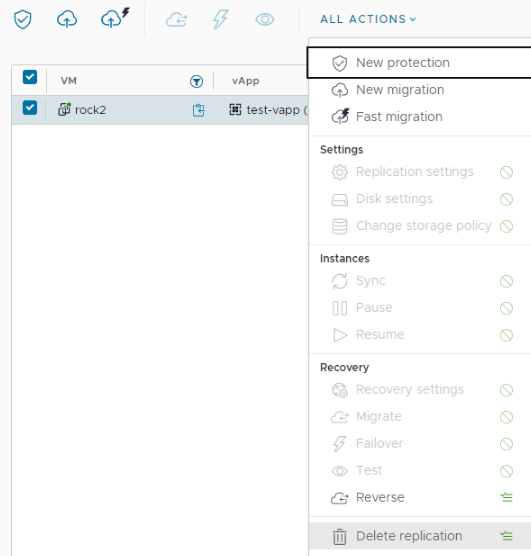
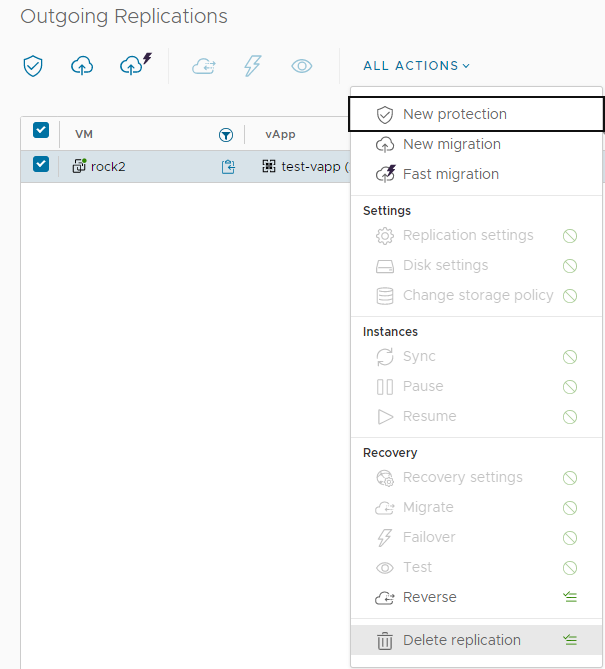
- Following migration, you are optionally able to configure an optimized reverse replication back to the original source VDC. An optimized reverse skips the initial full synchronization of data and just transfers the deltas. Optimized reverse is available for 7 days following the migration of the VM or until the original source VM is powered on.
- With the VM selected, click ALL ACTIONS > Reverse.
- If replication is not being reversed, the VM replication can be cleaned up by selecting the VM and clicking ALL ACTIONS > Delete replication.
- This will remove the replication configuration for the vApp/VM from VCDA. The vApp/VM itself will not be changed.
Performing a Recovery Plan Failover or Migration Plan Migration
Migrations can be performed on both Recovery Plans and Migration Plans. Failovers can only be performed on Recovery Plans.
Recovery and Migration plans should be created on the destination SDDC Flex region you are migrating to or failing over to.
- From destination SDDC Flex region, click on Recovery Plans on the menu on the lefthand side of the Availability interface.
- Then click on the arrows next to the relevant plan's name to highlight the Recovery or Migration plan.
- Then click either Failover (for Recovery Plans) or Migrate (for Migration Plans) to initiate the plan.


- Click OK when prompted to confirm initiation of the plan.
- The plan will then run and execute the first step. For each step a timeline of each action within the step will be displayed.
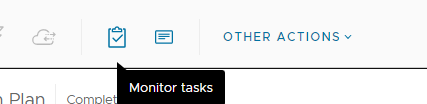
You can see additional detail for the running tasks during the execution of the plan by clicking the Monitor Tasks button which will take you to the Replication Tasks page.
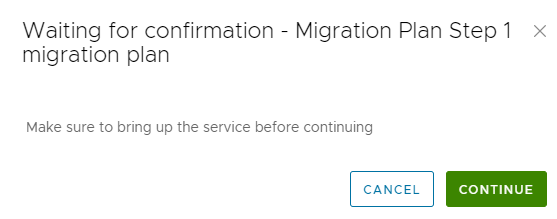
If a message prompt was added as an action in the step, you will be alerted to APPROVE PROMPT when the step reaches that action.
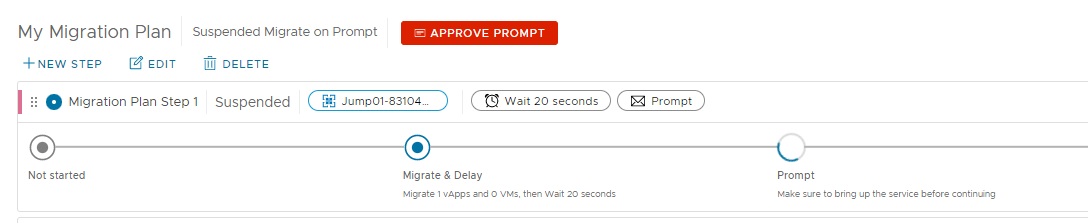
Click the APPROVE PROMPT button and then click CONTINUE when ready to continue with the next step.
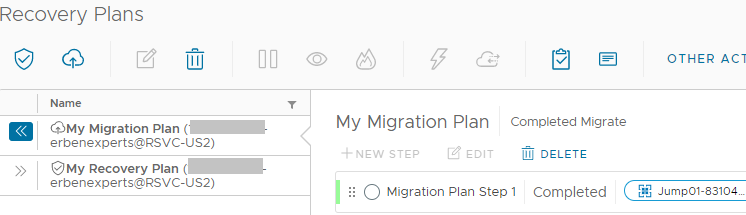
- When the plan completes you will see the Completed Migrate or Completed Recovery message displayed
Migrating vApp Templates
- From the menu on the lefthand side, click Outgoing Replications or Incoming Replications.
- Click TEMPLATES in the Groupings section.

- Mark the checkbox next to the vApp template you want to migrate.
- Then click ALL ACTIONS > Migrate
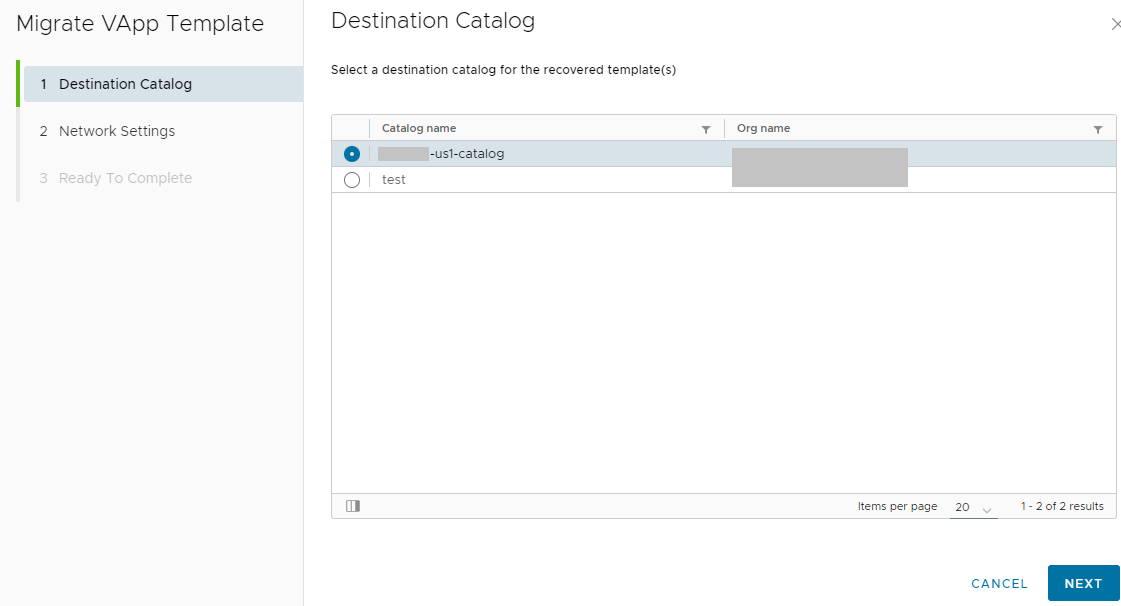
- On the Destination Catalog page, select the destination catalog to migrate the template to and then click NEXT.
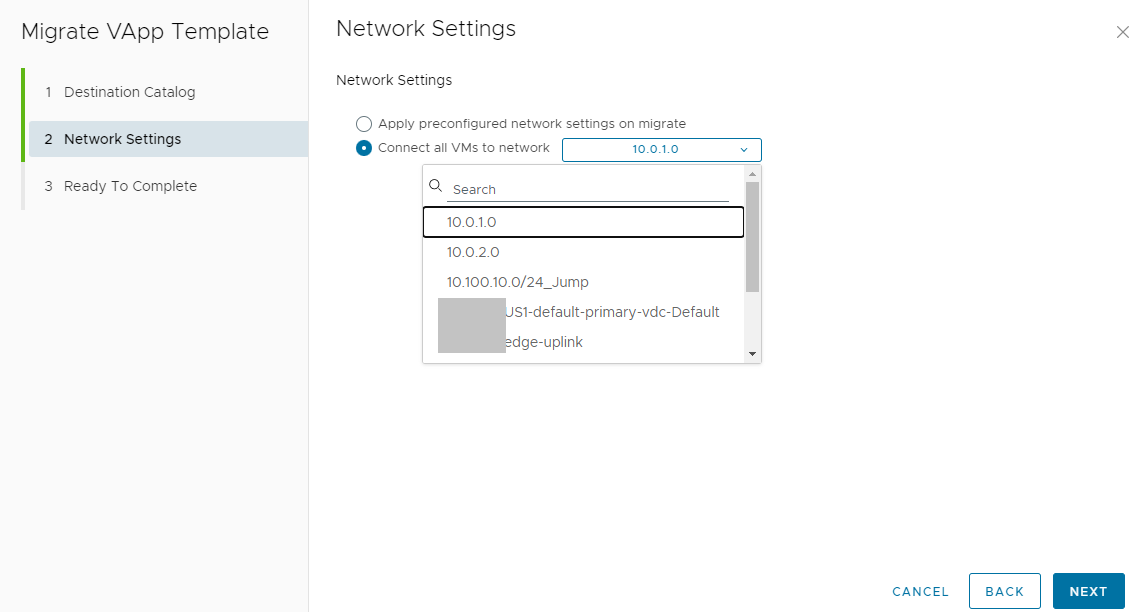
- On the Network Settings page, choose whether to Apply preconfigured network settings on migrate which have been previously configured in Recovery Settings or choose to Connect all VMs to network and select the desired network.
- Review the settings on the Ready To Complete page and click Finish.
- Cloud Director Availability will then perform a synchronization of the template to the destination VDC and import it to the destination catalog.
- The source template will be left unchanged in the source catalog.
- Once the migration has completed, click ALL ACTIONS > Delete replication to remove the replication from Cloud Director Availability.
Replication Status, Reports, Events and Alerts
Viewing Replication Status
Using the Availability user interface you can review information about your VM replications. This includes their health status, last replication time, live and historical bandwidth usage, and disk usage.
Status information can be viewed for individual vApps and VMs, as well as a summary for your entire organization.
Summary
When you first open the Availability UI a Dashboard providing an overview of your entire organization's replications is displayed.
From here you can see:
- the number, direction and status of your replications
- the total disk and traffic usage
- the total amount of CPU, memory and disk capacity required to bring online any VMs being replicated into this organization.
vApp/VM
- From the menu on the lefthand side, click Outgoing Replications or Incoming Replications.
- Click VM button in the Grouping selection area.
- NOTE: Traffic and disk usage information is available on a per VM basis and cannot be seen when using the vApp grouping option
- Mark the check box next to the VM for which you want to view information. Six tabs will be displayed in the lower half of the interface - Details, Instances, Tasks, Traffic, Disk Usage, and RPO Violations
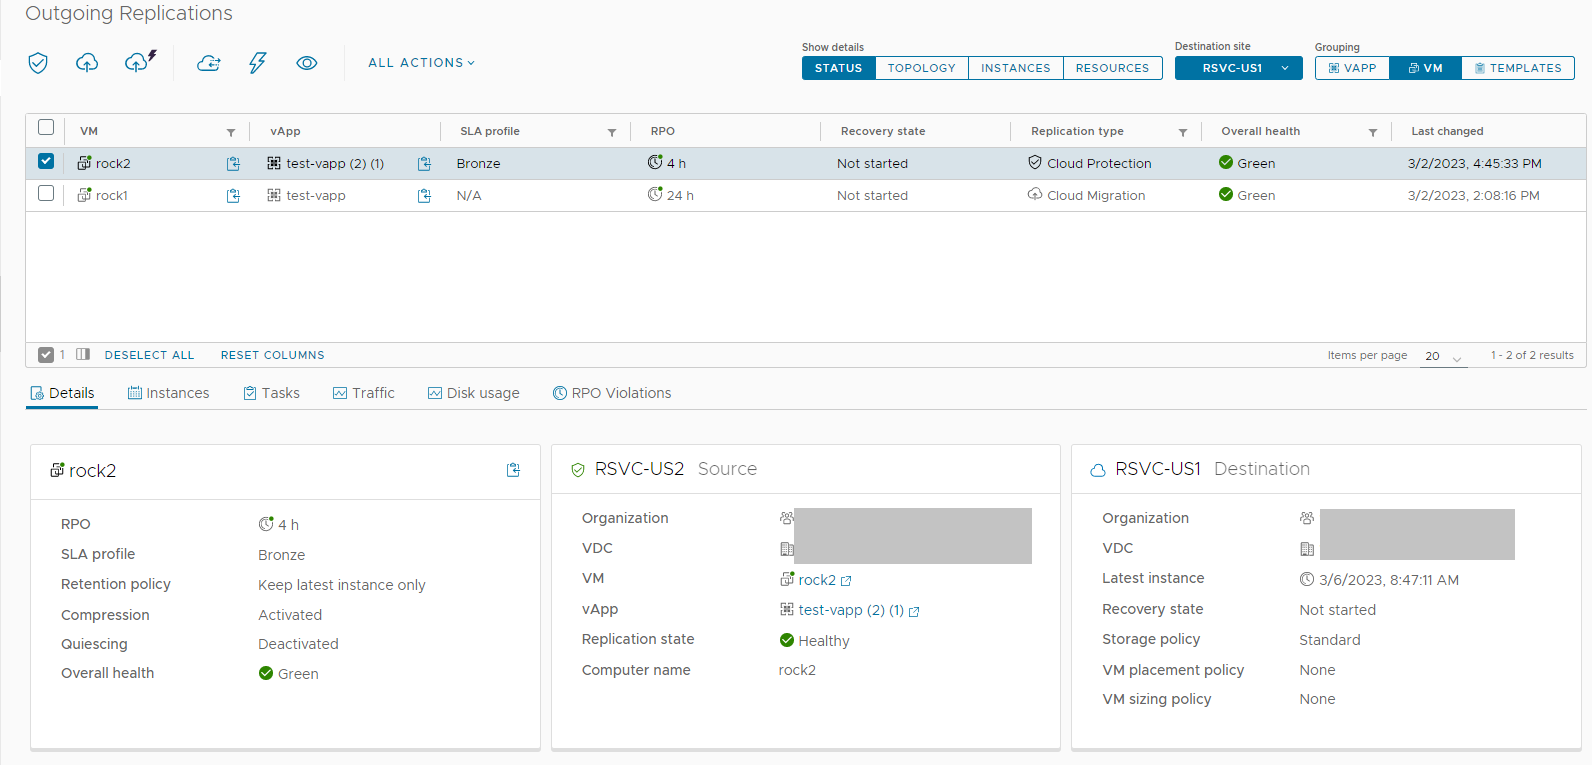
Details will display 3 information panes with more detailed information about the VM being replicated
- The information pane on the left provides information about the configuration of the replication - i.e. it's RPO, retention policy, compression and quiescing status, as well as the replications overall health.
- The middle pane provides information about the source VM, including its name, vApp, VDC and organization, and the health of the replication.
- The information pane on the right provides information about the destination VDC, including the destination organization name and VDC, storage policy information, and a date/time of when the last instance of the source VM was replicated to the destination VDC.
The Instances tab provides a view of the point in time instances (similar to snapshots) which exist at the destination VDC for this VM. Details of the latest instance of the VM at the destination VDC will be visible here.
- For each instance listed some summary information will be displayed, including the size of the changed data which was sent to the destination VDC when this instance was created, and how long it took to transfer the data.
- NOTE: If the transfer time is longer than the RPO interval, the VM will alert with an RPO violation

The Tasks tab provides a list of recent tasks which have been executed on this VM replication.

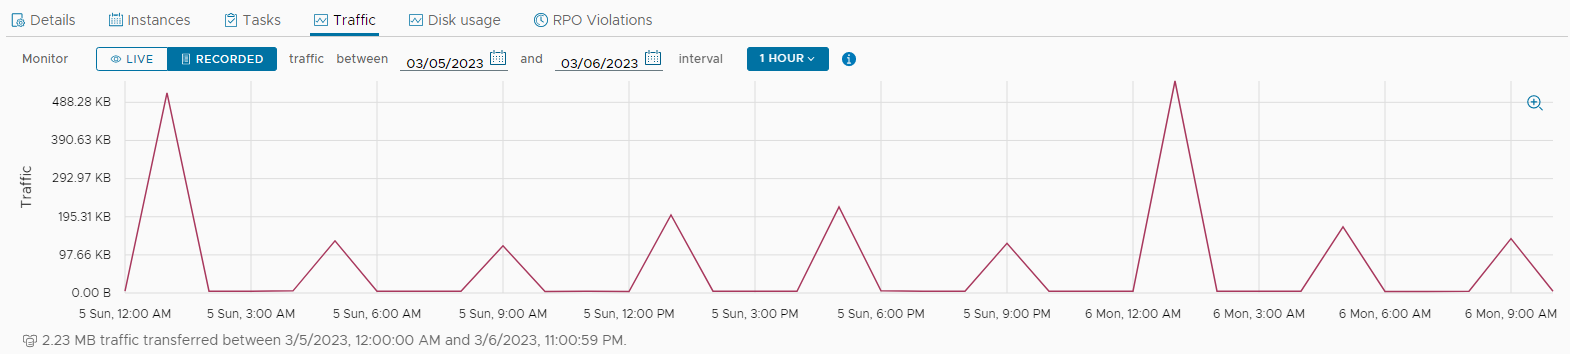
The Traffic tab provides real time and historical graphs of data transfer traffic. Use the LIVE and RECORDED buttons to move between the views. The traffic data can be viewed at different intervals of granularity, however the lower the interval the less historical data will be retained:
- 5-minute interval data is available for the last 5 hours
- hourly interval data is available for the last 14 days.
- daily interval data is available for the last 60 days.
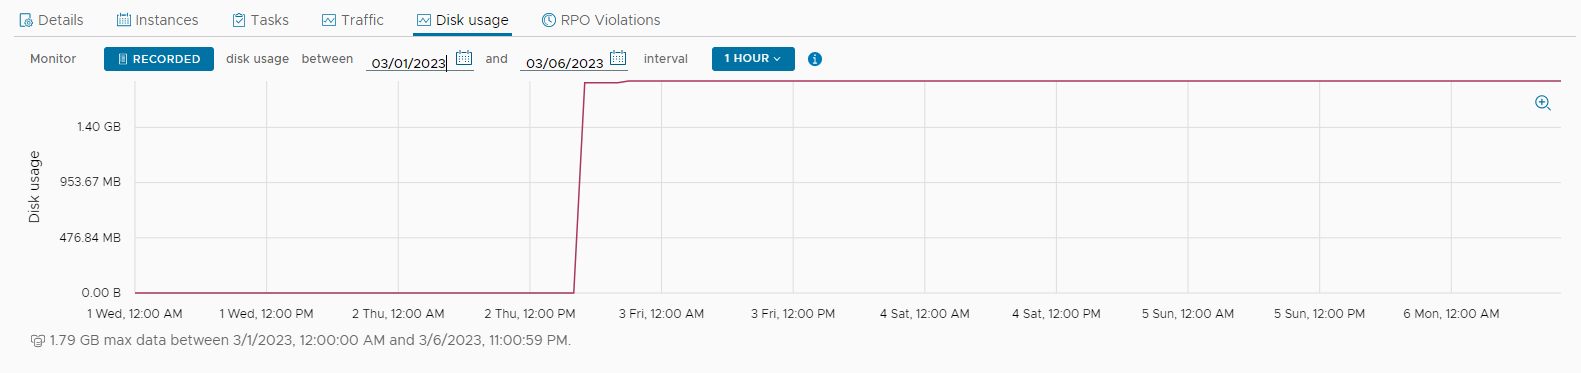
The Disk Usage tab displays historical information about disk usage of the replicated VM at the destination site. Similarly, to as found in the Traffic tab, this historical data can be viewed at multiple intervals which effects the length of time that data is retained.
The final tab shows any RPO Violations that have occurred for this replication.
Viewing Tasks
Recent tasks can be viewed for each vApp and VM, globally for your entire organization.
Per vApp/VM
- From the menu on the lefthand side, click Outgoing Replications or Incoming Replications.
- Mark the check box next to the VM for which you want to view information.
- Click the Tasks tab.
Globally
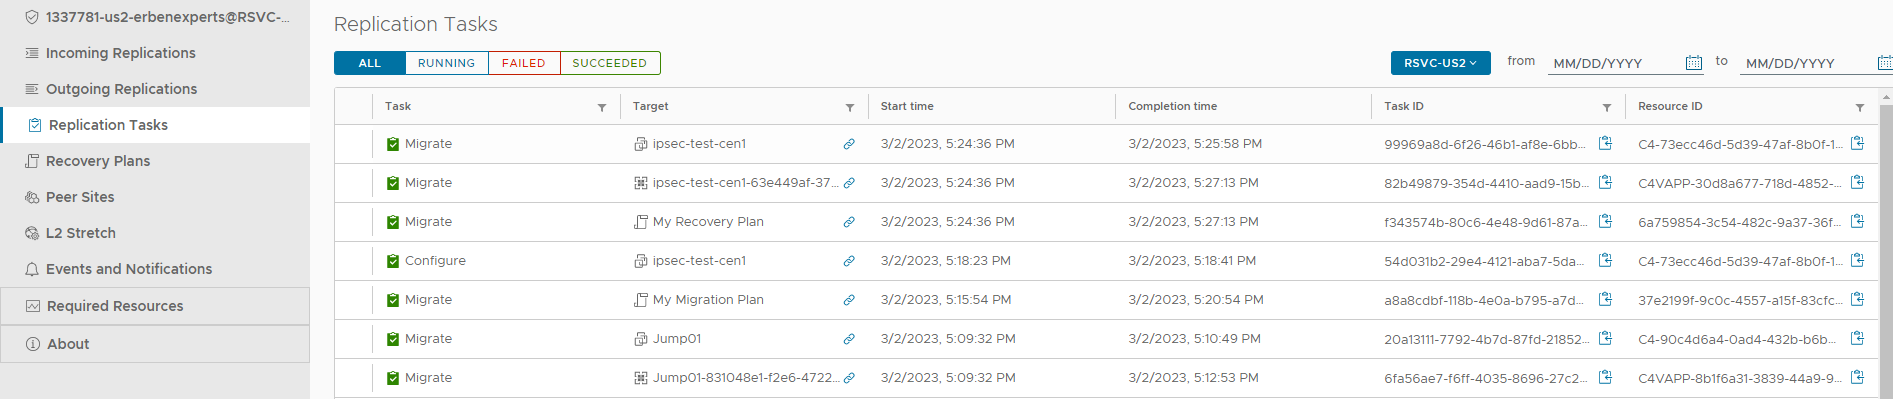
- From the menu on the lefthand side, click Replication Tasks.
- Use the buttons at the top of the page to filter the list of tasks.
Configuring Events and Notifications
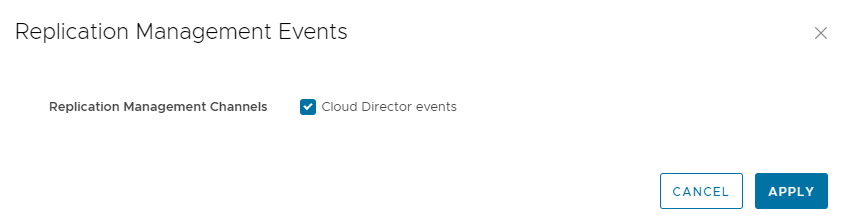
Optionally, events and notifications from Cloud Director Availability can be forwarded to your organization's Cloud Director events page. This includes replication reconfiguration events, replication errors, and RPO violations events. These events can be forwarded from Cloud Director to a configured email address as required.
- From the menu on the lefthand side, click Events and Notifications.
- Then click Edit next to the type of event you wish to configure - Replication Management events or Replication Monitoring events.
- Mark the checkbox and click APPLY to send the events to Cloud Director
Recovery and Migration Plan Reports
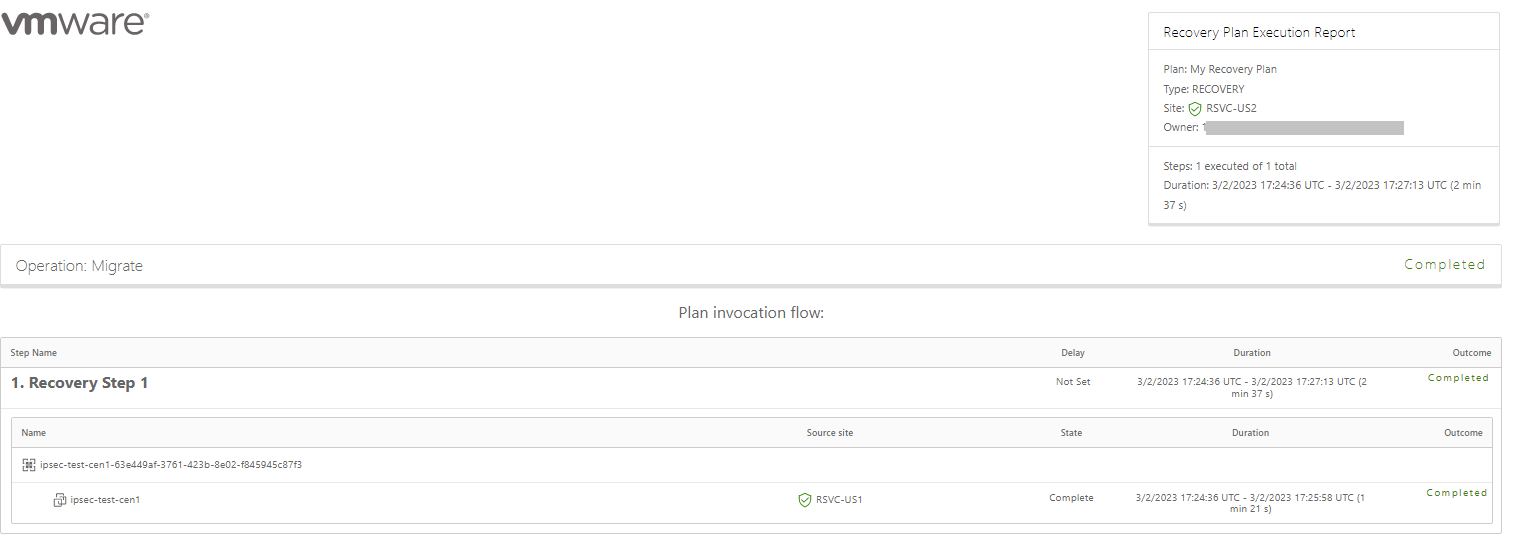
After executing a Recovery or Migration Plan, you can view an Execution Report which summarizes the steps taken, how long they took to complete, and their status.
- From destination SDDC Flex region, click on Recovery Plans on the menu on the lefthand side of the Availability interface.
- Then click on the arrows next to the relevant plan's name to highlight the Recovery or Migration plan.

- Click the Executions button to display a list of executions for the relevant plan.
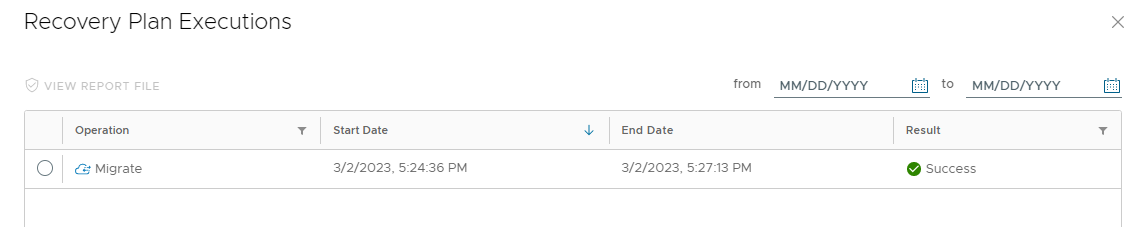
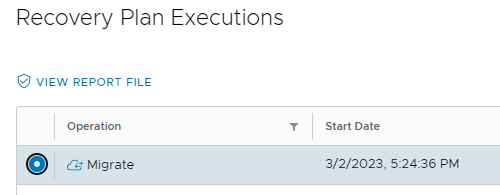
- Click the radio button next to the plan you want to see the detail about and then click VIEW REPORT FILE
- A new window will open displaying the execution report for the plan.
Resource Usage
Cloud Director Availability (which powers SDDC Flex Replication Services) replicates your VM's vDisks from source to destination VDC. The source and destination VDCs can be the same VDC in the same local organization, two different VDC's in the same local organization, or two different VDCs in different organizations, with the destination VDC being either in the local SDDC-Region or a remote SDDC Flex region.
When a VM replication is first configured an initial full synchronization of the VM's disks is performed. A named disk is created in the destination VDC (on the storage policy of your choosing) and the source vDisk's data blocks are read and transfered to the destination named disk. A single named disk will be created for each VM being replicated and its size will be equal to the size of all the vDisks for the single replicated VM. The creation of the named disk will consume capacity from the destination organization's storage quota. For example, if a VM with 5x 10GB vDisks is replicated, a single 50GB named disk will be created in the destination VDC.
If there is not sufficient capacity in the quota available, the creation of the vApp/VM replication will fail.

A few minutes after the full synchronization completes, the named disk may shrink in size as it converted to be thin-provisioned - consuming quota only for the used data present on the source vDisks.

Ensure you have sufficient quota at the destination VDC for the full capacity of any replicated vDisks in order to avoid replication failures or storage capacity contention following failover/migration.
Following the initial full synchronization Cloud Director Availability will track the usage of the source VM's data blocks and, when the configured RPO interval expires, read any blocks which have changed since the last replication and transfer that data to the destination VDC's named disk.
When performing a migration or failover to the destination VDC, a new VM will be created in Cloud Director for each replicated VM and the relevant named disk attached to the VM. The new VMs will be configured in accordance with the recovery settings set in Cloud Director Availability. Sufficient vCPU and Memory quota must be available at the destination organization in order to power on the VMs.
The resources required to power on VMs being replicated into the local organization are summarized in the Availability UI under Required Resources.

Here you can see a per-VM breakdown for the vCPUs, memory and disk capacity required for each VM, and a summary for all VMs in the top-right corner of the page.
The disk capacity required figure does not include the capacity required to create a virtual swap file for each VM during power-on. The virtual swap file will be equal to the size of the memory configured for each VM and will be allocated from the quota automatically at VM power-on.
To review your SDDC Flex Organization quota usage, please go to Administration > Settings > Quotas
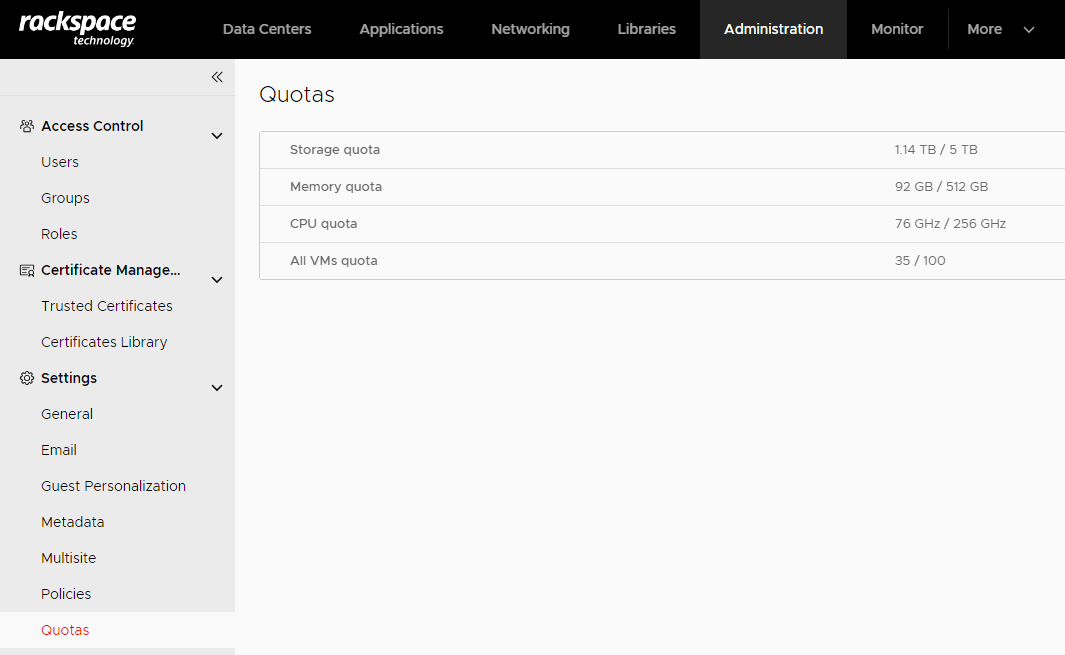
Here you will be able to view your CPU, Memory, Storage and # VM usage compared to the quota totals currently assigned to your organization. If you require an increase to your quota, please submit a support ticket.
Updated 5 months ago